I started learning sewing at a very young age. I always asked my mom, ‘How do I start sewing?’, ‘Can I cut that cloth pattern for you?’, etc. She used to teach me the basics whenever I had free time.
My curiosity led me to achieve my dream of becoming a professional designer! Now, many students in my workshop ask me the same questions at the start. Like them, you must have such queries about this skill if you haven’t learned it yet.
So, to sum it up, I decided to write an in-depth guide about ‘How to start sewing?’ It took me years of practice and hard work! And, I am giving my personal insights in this blog to help you with sewing. So, gear up and let’s learn!

How To Start Sewing?
You may feel overwhelmed when you start sewing for the first time. For me, it felt just like I was the first day of school- curious yet a little scared.
If you are starting with no experience, believe me- YOU’RE GONNA BE OKAY!
The points I have listed below will definitely help you get started sewing. So, let’s get you started in your sewing journey:
Step 1. Gather These 9 Main Sewing Tools:

First things first! Get your sewing notions!!! You will need these tools the most from day one:
1. Thread:
Try pulling the thread with your fingers and see how strong it is.
2. Hand or Machine Sewing Needles Pack:
I use needles from Singer and Universal brands most of the time. You can choose your favourite one!
3. Scissors:
I suggest keeping two scissors handy. One for fabric cutting. One for cutting paper for patterns.
Pro tip: Never mix these scissors. Use each one for its original cutting purpose. Otherwise, the blade of your scissors will get blunt faster.
4. Pins:
Bobby pins and safety pins keep your fabric in place before sewing.
5. Bodkin:
It’s a tweezers-shaped mini tool.
It’s useful to sew thread, elastic, cord, or tape through narrow gaps or waistbands, skirts, etc.
6. Fabric Chalk:
It’s useful for marking the pattern on the fabric.
7. Measuring Tape:
It’s used for measuring the fabric before cutting. You can also use a ruler instead of a measuring tape.
8. Seam Ripper, aka Stitch Unpicker:
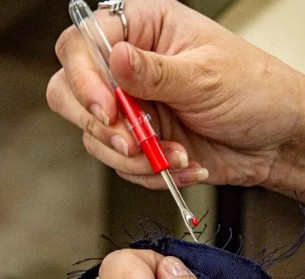
Sometimes, we need to rip the seams if sewn incorrectly. Or, we also rip them when we need to alter the clothes.
This is when you need a seam ripper. It flawlessly cuts the thread without damaging the fabric beneath it.
9. Iron (With Steam Would Be Better):

As a beginner, you must discipline yourself to iron each cut fabric before final sewing. It helps you to get the right measurements. It also stops the fraying of fabric threads.
Step 2. Get A Working Sewing Machine:
As a beginner, your teacher or coach will always ask you to start with hand-sewing. This is the crucial phase. Your fingers and eyes get used to sewing stitches, cutting patterns, etc.
Once you have practiced enough, you can shift to sewing clothes on a machine. This is the heart and soul of the whole sewing process!
Avoid choosing machines with electronic screens or digital buttons. To become a good stitcher, you must learn to rotate the knobs for stitch length, stitch thickness, tension, etc. You must learn to wind the bobbin, thread the needle, etc.
You don’t need to buy a fancy one just at the beginning. Start with a simple or second-hand manual machine at first. Practice on it for some months.
Even after many years of sewing, I prefer pre-owned sewing machines from trusted brands such as Singer, Juki, Pfaff, Usha, Brother, etc. You can get such machines at local sewing stores at an affordable rate.
But, Why Should You Get A Pre-owned Sewing Machine As A Beginner?
- You will save funds for your future sewing projects.
- Mostly, beginners are told to sew simple projects like tops, skirts, and pants. For such practice sessions, you don’t need an advanced machine at first.
- Most of the old machines are well-maintained, smooth, and sturdy. They are made to last long and offer the same service as a new machine.
- The machines from the 90s or 2000s are actual workhorses.
Step 3. Learn Sewing Machine Basics First:
No one expects you to be a Sewing Ninja on the first day.
I tell my students this all the time: GO WITH YOUR PACE. ALWAYS START WITH BASICS.
Once you master the basics of handling a sewing machine, you can easily handle an advanced machine for complex patterns.
So, for starters, what should you do?
- Start with simple cotton fabric.
- Try sewing zig-zag or straight stitches.
- Try adding simple seams and pleats.
- Try ripping the seams using seam rippers.
- Practice winding and unloading the front and top bobbin.
Practice sewing stretchy or lightweight fabrics.
Step 4. Start With Simple Patterns:
I give students these starter tasks: sew small grocery bags, pillow covers, tote bags, or face masks.
They are so easy to learn that even a kid can sew them!
Practicing these patterns is like building a foundation for your skills. Don’t worry if you don’t understand any pattern at first. This happens with many beginners. Take it slow, ask questions to your trainer, and try that pattern.
In the initial days, it’s okay even if you cut the fabric wrong. Mistakes can happen. And, this is how you learn! Trust your gut and try again until you cut the fabric with the right patterns.
But, What About Fabric?

I always suggest choosing cotton, linen, hemp, etc., at first. These woven fabrics are not too thick or too thin. They are not stretchy or slippery. So, I feel, they are perfect for beginners to start with.
Once you master sewing clothes from these fabrics, you can shift to light fabrics like silk, satin, etc., or thick fabrics like jute, denim, etc. Because each type of fabric needs different needles, machine settings, and stitch styles.
Secret tip: In my early days, I used to cut a newspaper for a pattern. I used to mark it on canvas paper, and then cut and stitch it. This routine of paper stitching helped me practice stitching easily. This is an Indian trick that I learned from my mom.
7 Essential Steps To Operate a Sewing Machine:
1. Set Up The Machine:
Set your machine on the sewing machine table.
Connect the power cable to the machine and the foot pedal.
Switch on the button for power.
2. Wind The Bobbin:
Put one end of the thread spool on the bobbin. This thread should match the top thread.
Fill the bobbin using the bobbin winder. Put the filled bobbin in the bobbin case. Locate the needle plate and fix that bobbin case there.
Don’t Have A Bobbin Winder?
I also did not have a bobbin winder at first. I used this hack-
Use your machine’s wheel to fill the bobbin. Put the bobbin in a screwdriver or a long pencil. Put the thread end from the top thread spool on the bobbin.
Gently touch the edge of the bobbin to the machine’s wheel. Now, rotate the wheel quickly. Bobbin gets filled automatically with the wheel’s rotations.
3. Pass The Thread From Thread Guides:
As per the numbers on your machine’s arm, pass the top thread through the thread guides. Finally, pass the thread through the lever and needlehole.
For starters, keep the stitch length at 2.5 or 3. These stitches are not too short or too long.
4. Catch The Bobbin Thread:
Gently turn the machine’s wheel to move the needle down slightly. Bobbin thread becomes visible. Pull both threads to the back. In this way, you catch the bobbin thread at the needle plate.
5. Start Sewing:
Move the lever slightly upwards. Place the fabric below the presser foot. Use cotton or linen fabric initially for practice.
Lower the lever. Push the foot pedal, move the needle.
And, start sewing. I suggest starting with straight stitches first. These stitches are easy to learn.
6. Add Backstitches:
We need to secure seams after giving all stitches.
At the end of the fabric, sew 3-4 stitches forward. Hold the lever. Sew backwards.
Again, sew forward to safeguard the seam.
7. Cut The Thread:
Rotate the handwheel in the opposite direction to lift the needle.
Move the presser foot upwards. Take out the fabric.
Cut the top thread and bobbin thread from the fabric using scissors.
3 Important Tips To Become A Better Stitcher:
1. Fix The Bobbin Properly:
Threading and winding the bobbin properly is a must if you want firm backstitches. Put it in the bobbin case for fixing the tension.
If you fix it improperly in the bobbin case, the fabric may get loose stitches.
2. Properly Set Tension On Top Thread:
Like bobbins, the top thread is also crucial in the stitching process. Adjust tension disc, stitch length, and stitch type. Lower the lever and then sew the fabric. Otherwise, you will get loose or messy stitches on the upside, too.
3. Never Pull Or Push Fabric Forcefully While Sewing:
Always guide your fabric gently towards the moving needle. Otherwise, the fabric can get torn or damaged if you pull or push it.
The machine’s feed dogs will automatically move the fabric forward after each stitch.
Key Takeaways:
Many beginners feel anxious when learning sewing. Trust me, it is very easy. You need to follow the right steps to get it done!
Keep all necessary sewing tools handy. Always start with a simple fabric like cotton. It is the easiest to sew. Practice patterns on paper. Use the handwheel without a needle to get an overall idea of sewing speed.
Set the machine properly. Sew with simple straight stitches first. You can advance the techniques slowly. Go at your pace. And don’t worry if you mess up the stitches. It happens with everyone.
With constant practice, you will master this skill! If you need any more help starting your sewing journey, send me an email with your query!
Best wishes!