I met a new student, Lisa, in my sewing class. She had been using the machine for over a month. But she was getting bad-quality stitches. I checked her machine, and I knew what she needed to do! I told her easy hacks to adjust the sewing machine tension. She got perfect stitches with the tricks I shared. She was so happy; she said, ‘I wonder how no one ever told me to adjust the sewing machine tension this easily. Thanks!’
Has this happened with you too? Has your sewing machine ever skipped stitches? Or has it shown thread bunching? I face these issues more with my beginner students. I have even seen puckered seams on fabrics. This mainly happens due to mismatched tension. Normally, this tension should be 4 or 5 (considered the normal middle setting)
I have written this detailed guide on how to adjust tension. Learn to check loose or tight stitches and fix them yourself with this blog. You will be able to sew straight stitches that not only look beautiful, but remain firm forever.
So, let us go ahead and learn more!
What Is Sewing Machine Tension?
- When the needle pierces the fabric, it pulls the top thread underneath the fabric.
- The hook passes through the fabric to catch the top thread. It loops the top thread around the bobbin.
- When the needle moves up, the looped top thread pulls the bobbin thread up.
- Then the feed dogs move the fabric forward to sew the next stitch in the same way.
Proper thread tension balances this process and shows equal stitches on both sides of the fabric. There is zero pull, puckering, or loop formation.
If you see loops or pulled stitches, thread tension may be too low or too high.
Is Your Sewing Machine’s Tension Wrong? Know These Symptoms
Many beginners get these signs of mismatched thread tension.
Are you also seeing these signs?:
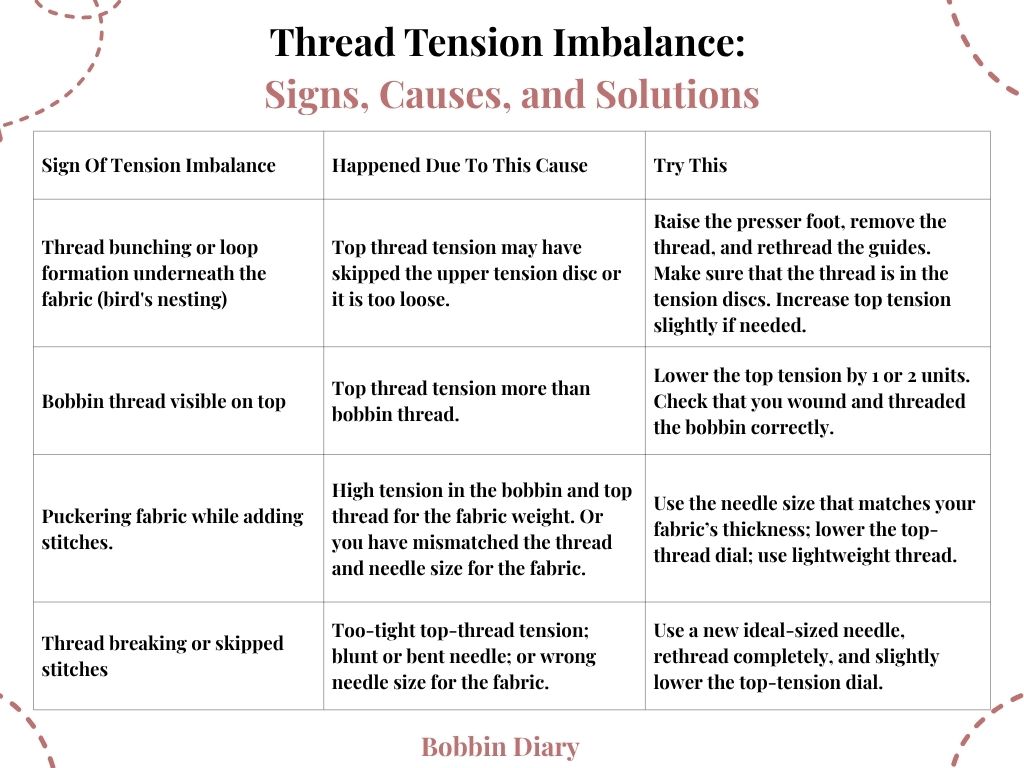
- Bobbin thread is visible on the top side.
- Skipped stitches or broken thread.
- Thread bunching underneath the fabric.c
- Fabric puckering
Do This Before You Touch The Tension Dial:
Sometimes, the tension problem goes away without moving the tension dial.
For that, try these initial steps first:
- Remove the top thread completely.
- Raise the presser foot and rethread the guides again.
- Check the bobbin. Remove it if it is not wound properly. Re-insert it again.
- Next, check the needle. Remove it if it is dull, bent, or damaged. Attach a right-sized needle for your fabric.
- Check for lint and debris stuck in the bobbin and threading guides. Remove the dirt from these parts. Try stitching the fabric again.
If the stitch is still incorrect, then it’s time to adjust tension.
Check the Thread Tension With This Test:
I always tell my students (who don’t know how to adjust sewing machine tension) to do this test on the fabric before sewing. It helps you understand the exact issue.
Here is the test:
- Use a double-layered scrap fabric.
- Use contrasting thread colors for the top and bobbin threads.
- Try adding straight stitches on this fabric.
- You get messy stitches on either side if the tension is adjusted incorrectly.
- So, what happened?
- Bobbin thread broke: adjust the dial up
- The top thread broke: adjust the dial down
- The stitches look good and strong: you are okay! The thread’s tension is correct.
Pro-tip: Rotate the top dial 1/2 step or 1/8th part at a time until you get neat and balanced stitches on both sides.
Quick Steps To Adjust The Upper Thread Tension:
I recommend following these steps to set upper thread tension
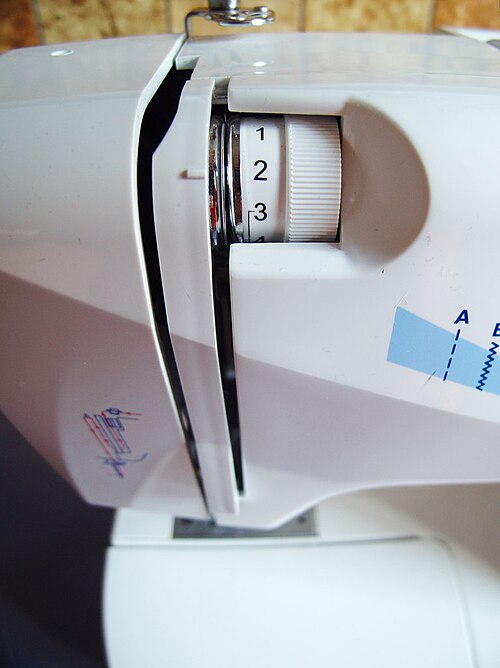
- Locate the tension dial. It will have various numbers.
- The lower the number, the looser the stitch, and vice versa.
- Start from the default setting.
- Start sewing a few stitches.
- Identify how much the dial can rotate for each stitch quality.
- Check both sides while doing this.
- Slowly and steadily adjust one number at a time and test again.
- Avoid tightening this dial more.
- For each fabric type, make a chart for your reference: include which stitch dial setting for that specific fabric and thread.
Adjusting The Bobbin Tension: Do It Only If Needed!
Adjust the upper thread tension first.
If the bobbin thread still breaks at the maximum top tension setting, adjust the bobbin tension.
1. Too Tight Tension:
- Take out the bobbin case. Keep it on a flat surface like a table.
- Put the fully wound bobbin in the bobbin case.
- Gently pull the thread tip and try lifting the bobbin case from the table.
- If the bobbin case lifts upward, the tension is tight.
- Loosen the screw on the bobbin case using a small screwdriver. Move it counter-clockwise (keep 1/8 rotation at a time).
- Here, moving the screwdriver to the right side tightens the screw, and rotating it to the left loosens the screw.
2. Too Loose Tension:
- Again, put the fully wound bobbin in the bobbin case.
- Gently pull the thread tip and try lifting the bobbin case from the table.
- If the bobbin case stays on the table and the thread comes out of it, the tension is low/ loose.
- Use the same screwdriver and rotate the screw on the bobbin case clockwise to tighten it (keep it to less than 1/8 rotation each time)
If you are unsure about screwdriver adjustments for the bobbin case, you can check your machine’s user manual or ask a technician.
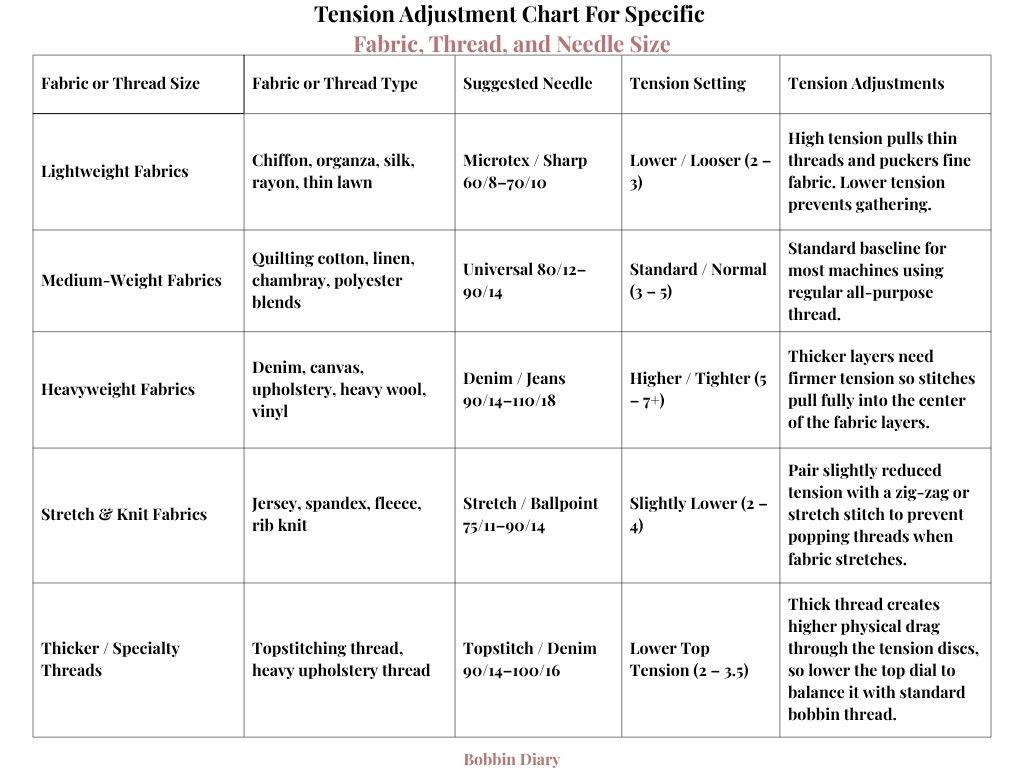
Sewing Machine Tension Settings For Different Fabrics and Threads
You can save this chart for future reference:
4 Common Mistakes While Adjusting Tension:
⛔Changing tension dial settings at a time.
⛔Adjusting the tension dial before you rethread the guides.
⛔Not testing on a scrap fabric to confirm neat and good-quality final stitches
⛔Skipping resetting the tension dial after a project. Using the same settings for the next sewing project.
FAQs:
1. What Is The Ideal Setting For My Domestic Sewing Machine Tension?
The setting of 4 to 5 on a 0-9 scale dial is usually ideal for any domestic sewing machine. This setting is 3-4 for lightweight fabric, 4-5 for medium-weight fabric, 5-6 for heavyweight fabric, and 3.5 to 4.5 for knitted and stretchy fabric.
2. Why Is My Sewing Thread Bunching Underneath?
You may have too loose upper thread tension (dial at 0 or 1). The thread slips through the tension discs. The machine doesn’t pull the top thread up. However, the bobbin thread pulls the loose upper thread underneath the fabric. It creates loops, tangles, and bunching.
3. Should I Adjust Top Tension Or Bobbin Tension?
Most of the time, you must check and adjust the top thread tension first. Bobbin thread tension is secondary.
4. Can Fabric Thickness Affect Sewing Machine Tension?
Yes. Fabric thickness affects this tension. Light fabrics like silk, cotton, etc., offer low resistance. They pucker easily due to higher tension. However, thick fabrics like denim, jute, etc., can create friction. Such fabrics drag against the needle. Your machine may even skip the stitches.
My Two Cents:
Sewing machine tension is very easy to tackle. I hope the tips in this article helped you to solve your sewing machine’s tension issues.
Do not fix the dial first. Instead, check the top thread guides, bobbin direction, lint/ debris in the bobbin area, needle condition, and thread quality. If all these parameters are okay, then check the top thread tension setting.
If the stitch quality is still low, check the bobbin tension. Try the drop test for bobbins and the scrap fabric test to check stitch quality. Rotate the dial slightly (1/8 of a turn) and check the stitch. Keep doing it until you get perfect stitches.
For a new project, never use previous tension settings.
New thread, new needle, new fabric- needs new tension settings! You can also check my article on thread bunching for more details about tension settings.
What did you learn in this guide? Do let me know your feedback in the comments below!