Beginners often make mistakes with puckering fabric. Fabric may bunch after passing under the needle! It happened to me, too. Do you know why this happens?
We may use the wrong presser foot with the feed dog. A regular tailor must keep around 7-8 presser feet handy. A right-presser foot ensures smooth feeding while holding the fabric firmly. So no puckering, no uneven stitches, and no damage to fabric!
If you are also looking for different presser feet types, this article is for you! I have been using them for years now. So, let us move ahead and know more about them:
What Is A Presser Foot?
Many people confuse presser feet with the shank. Are both parts really the same? Not exactly.
Shank holds the presser foot. However, the presser foot adds pressure on the fabric for easy feeding. A screw or snap connects these two parts.
So, Is Your Machine Low Shank Or High Shank?
Many beginners confuse these terms. Mostly, older machines were high shank. However, nowadays, domestic machines are low-shank.
To Measure Shank:
First, lower the presser foot. Take a ruler or measuring tape.
Measure the distance from the bottom of the screw to the needle plate (at the bed).

Do You Know Slant Shank?
My grandma had a Singer 500A machine. It had a slant shank. It also measured a ¾ to 1 inch from the bed to the screw. I found it really fascinating.
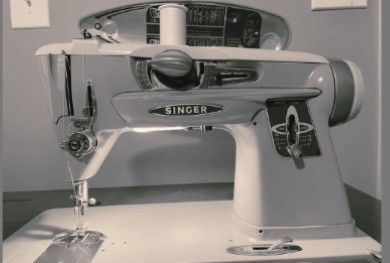
Many Singer models, such as 301, 401, 600, 700, had slant shanks in the 1950s-70s. These machines had a slanting shank in the forward direction.
8 Types Of Presser Foot: Every Beginner Must Know.

This is my set of presser feet from Juki. You may not need all of these at first. I suggest working with the basic presser feet first. Then, get the full set.
As a beginner, you must have the following presser feet in your sewing kit:
1. Universal Presser Foot:

This is a 3-IN-1 FOOT that helps stitching fabric in quilting, hemming, and decorative work like pintucks, gathers, etc.
One tool- many purposes!
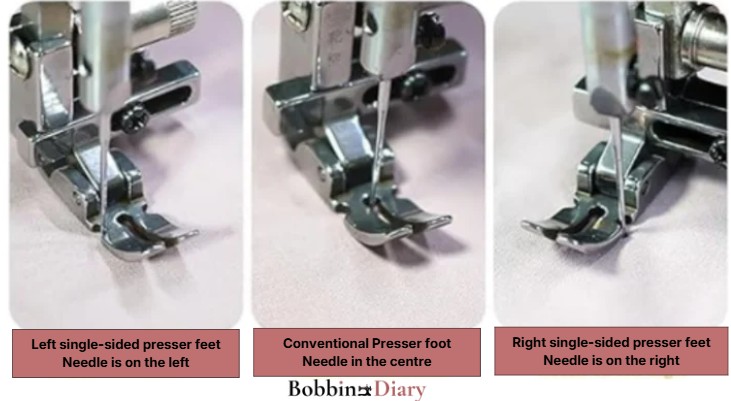
So, even if you are a budding tailor, it is a must-have tool in your sewing kit. This foot is compatible with most of the domestic and low-shank machines.
The adjustable universal foot has movable guides. When I need even stitching at the top and edges, this foot works the best! It has a wide opening. So, you can set the needle at different positions for smooth zigzag stitches.
It is made of durable metal or plastic. So, you can use it for years without worrying about breakage. It gives a professional finish for decorative work like embroidery.
2. Zipper Foot:

Do you want to change the zippers of your pants or sew a handy pouch?
If yes, then a zipper foot will help the best!
This foot navigates the needle to stitch next to the zipper. I use it to make and add piping in the seams.
You can easily see the needle when using this foot for correct stitches
3. Buttonhole Foot:
This foot can create buttonholes consistently!
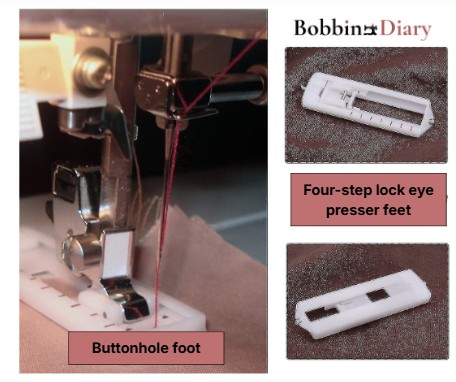
It has a sliding tray on the backside to hold the button. It can measure and sew the exact-sized buttonhole on the fabric.
This sliding tray can be operated automatically or manually. If you have an automatic machine, pull the buttonhole level downwards.
Push the pedal. Your machine will automatically stitch the hole. It will also stop automatically after it finishes making the hole.
4. Seam Foot:

If you want to add straight seams with precision, this foot is the best option. This 1/4-inch or 0.65 cm long foot has a simple guide on its right edge.
Due to its distinctive length, it is also known as the ‘quarter foot’. Apart from a quarter foot, a seam foot can be adjustable or come without guides.
The small hole on this foot keeps thin fabrics neat and plain when we slide it towards the needle. It prevents the fabric surface from being pulled into the needle plate when stitching.
A quarter-foot with markings at ¼-inch helps for even stitches on patchwork, fabric, or quilts. This tiny tool can join two fabrics with a smooth finish.
5. Blind stitch Hem Foot:

This foot helps add blind stitches. It keeps the fabric tucked at one spot until the needle adds stitches.
It gives a smooth finish on the edge without a visible seam. The adjustable blind hem foot has a metal screw.
It helps to move the marking guide to the right or left side. So you take the proper length of fabric to be covered in the stitch.
6. Binder Foot:
As its name suggests, it easily binds two or more pieces of fabric.
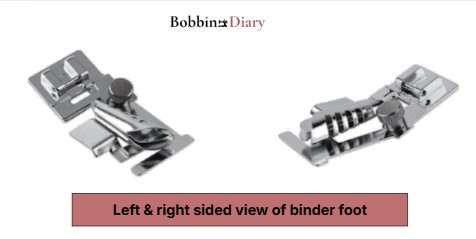
A binder foot joins bias tape in a single step when quilting. This prevents unnecessary fabric fraying. It keeps the binding folded when sewing.
Just feed the fabric (on which you want to add the binding) in the gap between the U-shaped legs of this foot. And, start sewing. It will automatically start binding.
7. Pintuck Foot:
Want to add some art to your fabric? A Pintuck foot can help you!

This tiny foot can help us create the most beautiful pintucks with a double (twin)needle. You can create parallel tucks with a smooth finish using it.
You need to increase the tension slightly, depending on the fabric, to get those smoothly finished tucks.
It is suitable for adding tucks to lightweight to medium-weight fabrics, such as silk, satin, georgette, organza, etc.
8. Beading Foot:
Who doesn’t love a slight bling on the clothes?
It brings a vibe and a beautiful look, especially on skirts, tops, purses, etc.!
A beading foot is used to add these blingy embellishments to the fabric. You can sew bead strings, cords, pearls, sequins, feathers, and laces using this foot on the garment.

It guides the bead strand into the groove on its underside. Just set the machine to zigzag stitch with a 3-4 mm setting. This length will depend on the size of the beads or embellishments you are using.
Also, the bead size must match the foot’s groove (tunnel or channel) size. Do not push or pull the fabric or strings.
I always use monofilament thread to make the stitches invisible under the beads. This helps to improve the overall blingy look of the garment. If you don’t have monofilament thread, use a thread matching the fabric color.
Other Presser Feet That You Must Know:
1. Cording foot:
It helps to stitch three or more fine cords or braids. It adds a 3D decorative texture to cushions, napkins, curtains, etc.
2. Darning foot:
It helps to mend fabrics and adds decorative embroidery to clothes. So, if you need an emergency DIY project to be done, this foot can help!
3. Piping foot:
It strengthens and styles edges. For decorative purposes, it can enhance the look of necklines, cushion borders, napkins, etc.
4. Ruffler foot:
We can sew beautiful ruffles and pleats using this foot. It can sew any sizes of ruffles at even distances for a smooth finish!
My Two Cents:
Presser feet ensure firm stitches without puckering fabric. All you need to know is how to operate them properly! Whether it is a universal foot, a seam foot, or a beading foot, each one has its own specialities.
I prefer using a universal foot for most of my stitching work. It’s reliable and very easy to handle. I hope this guide on ‘types of presser feet and thier uses’ has given you useful insights.
All work with the same basic mechanism. Just lift the lever, attach or replace the presser feet, and start stitching!
Which one do you like the most? Do let me know in the comments!
FAQs:
1. Which Is The Best Presser Foot In Sewing?
The all-purpose foot, aka standard Zigzag (‘J’) foot, is the best overall. Beginners can easily use it for most stitching projects. Also, a 1/4-inch foot is ideal for general sewing, topstitching, and other projects like quilting.
2. Why Is A Presser Foot Necesaary In Sewing Machine?
Without a Presser foot, the fabric will get puckered and damaged. If you need aligned, even, and firm stitches, a presser foot is a must!