I grew up seeing my mom as a businesswoman! Yes, she had a tailoring shop back in the 80s. I used to ask her, ‘Mom, what’s the name of this sewing machine’s part? What’s its use?’, etc… etc…!
She used to answer all my questions happily! One Sunday afternoon, I observed that many beginners in my class had similar questions.
So, while writing this blog, I made sure that no query remains unanswered. For that, I have written this wholesome guide about ‘sewing machine parts and their uses’!
It’s like a 101 glossary of these parts you can rely on anytime!
22 Top Sewing Machine Parts:
I have divided these parts according to their purpose. Let us explore each of them below:
1. Head:
It’s the upper part of the sewing machine without a stand. It involves all primary working parts of the sewing process.
2. Spool:

We all have thread spools at home, right?
A thread spool can be made from wood or plastic. The thread is rolled around its cylindrical shape. It is fixed on a thread spool pin.
3. Spool Pin:

A spool pin is a metal rod. It is vertically fitted on the machine’s arm.
4. Thread Guide:
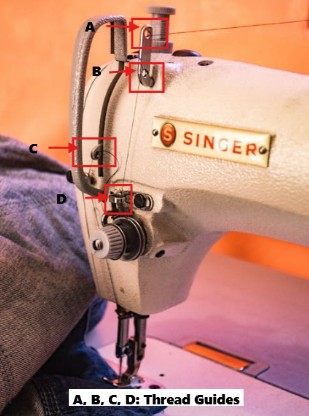
We can say a thread guide is a bridge that carries the thread from the spool to the needle. A normal sewing machine has 4 to 7 thread guides, starting from the spool to the needle.
Many homes still have the traditional machines. If you also have such a sewing machine, I am sharing the thread guides below:
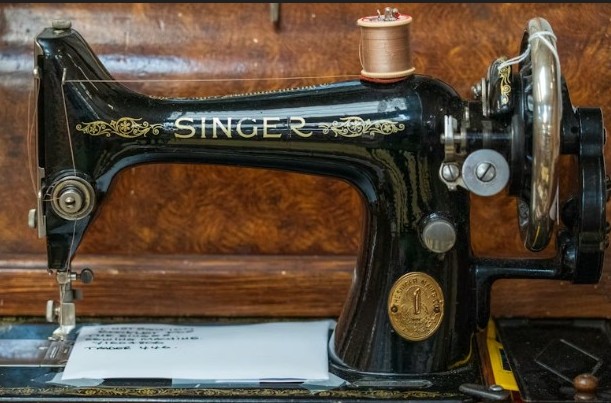
The very first thread guide holds the spool.
The second one is the hook on the top.
Then, the tension disc thread guides from which the thread passes under tension.
Then, the thread passes through the take-up lever thread guides. It moves up and down to pull the thread from the spool.
You may find one or two hooks above the needle. These are called ‘lower guides.’
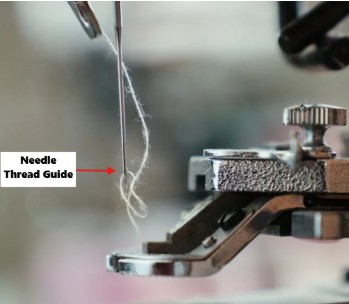
The thread passes from these hooks to the needle eye. It is the final thread guide.
5. Thread Take-Up Lever:

As I said above, this is one of the thread guides in a sewing machine. But why is it so important?
Because it pulls thread from the spool. This pull helps to tighten each stitch. This lever also prevents thread tangling. In this way, we get consistent top stitches.
Okay, but you may ask, where to find it? It’s just above the sewing machine’s needle. It is fitted to the sewing machine’s arm. It looks like a metallic lever arm.
6. Bobbin:
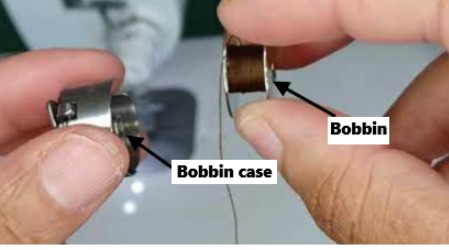
It’s like a smaller version of Spool. It wraps the lower thread around a metallic or plastic wheel. It can be front-loading or top-loading (drop-in).
Bobbin helps with bottom lockstitches. It feeds from below and meets the top thread. This results in consistent seams.
7. Bobbin Case:
I call it ‘the house of bobbin’! 😄
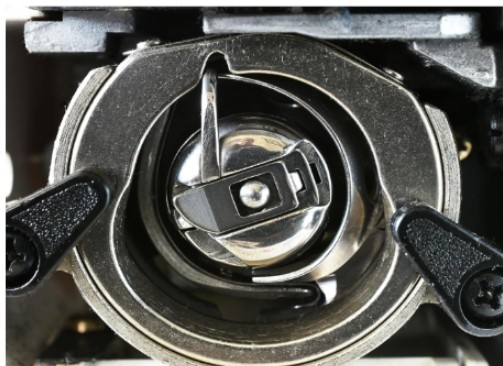
A bobbin case keeps the bobbin in the right position. It also maintains tension on the bobbin thread for secure stitches.
Apart from this, it hooks the thread to create lockstitches underneath the fabric.
8. Bobbin Winder:

Have you ever emptied your bobbin thread? That’s when a bobbin winder helps to refill it.
Back in the old days, I used to wind a bobbin using the machine’s wheel. You may have also done it!
Nowadays, many machines have an in-built bobbin winder. It has a spindle, a tension disc, and an automatic stop mechanism.
The thread goes from the spool through a tension disc. It is then wound with the bobbin. Its stop mechanism pauses winding automatically to prevent overfilling of the thread.
9. Side Plate:

You may know it as the bobbin cover or bobbin slide plate. This plate is made from stainless steel or plastic.
It is a rectangular-shaped cover. You may locate it on the machine’s bed, adjacent to the needle plate.
Using this cover, you can remove or insert the bobbin case in the sewing machine. It prevents dust penetration into the bobbin case. It also prevents bobbin threads from getting tangled.
I like its polished finish. It allows cloth to be sewn to glide without friction. It also safeguards our fingers from getting caught in fast-moving parts near the needle plate
10. Feed Dog:
These are tiny serrated metal teeth. You may find them under the needle plate.
Feed dogs hold the fabric from the bottom. They can also pull the fabric little backwards to ensure even stitches.
11. Presser Foot:

This part keeps the cloth flat against the feed dogs. You may locate it underneath the needle. It offers needed pressure for even stitches.
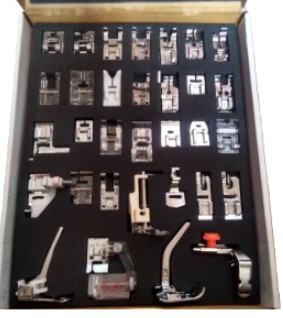
This ensures smooth feeding and prevents puckering on lightweight fabric. You can interchange the presser foot to perform other sewing tasks, such as adding zippers, stitching buttonholes, or hemming.
I use a standard foot for general sewing purposes. For zipping and piping, I use a Singer zipper presser foot. Also, I use a blind hem foot to create invisible hems.
Do you know? There are 32 types of presser feet available for different purposes!
12. Presser Foot Lifter (Lever):

I call it the ‘PFL’!
It is a tiny lever that raises and lowers a presser foot. You can locate it just behind or to the side of the needle bar of your sewing machine.
When must we keep the presser foot lever upwards?
- Of course, when we need to change or adjust the fabric,
- when we need to change the presser feet,
- or when we need to thread the machine needle. It assures that the thread fits correctly in the tension discs.
- Some machines have a higher lift. In this way, we can place thick fabric below the presser foot.
When must we move the presser foot lever downwards?
- Lower it when we need to secure the fabric for sewing, and
- when we need to have tension in the top thread.
13. Extension Table:

Let’s say you are stitching a quilt or stretchy fabric. Keeping it hanging while sewing may result in uneven stitches. That’s when an extension table comes in handy. Your fabric won’t bunch up when kept on this table.
It is a flat wooden or plastic table-top-like part. It is used to lay the fabric flat while sewing. We get extra space to spread the fabric. I really find it useful for sewing thick fabrics. I get more stability and accurate stitches.
14. Needle:
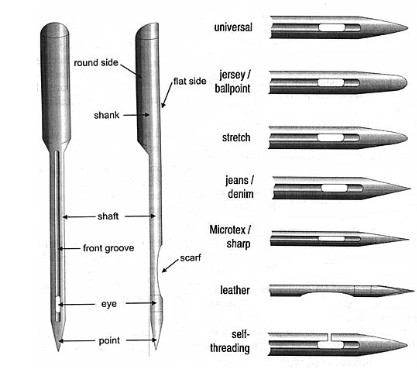
This is the part that actually sews the thread into the fabric! The shapes of these needles differ according to their purpose. For general uses, I use a universal needle.
I have explained the main parts of the sewing machine needle below:
- Eye: The top thread is passed through it.
- Point: This sharp tip pierces fabric to make stitches.
- Shank: This area is connected to the sewing machine’s needle holder/
- Shaft: It carries the needle eye and the thread through the fabric downwards to the bobbin.
- Groove: It divides the shaft in front. It keeps the thread closer to the needle when the tip penetrates through the fabric.
These needles differ in size, from 0.60 mm to 1.30 mm (light to thick fabric, respectively).
15. Needle Clamp Screw:
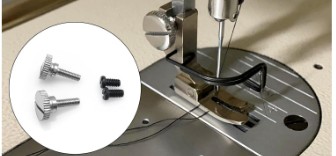
This screw holds the sewing machine needle in place. With the clamp settings, it aligns the needle vertically. So, we can prevent skipped stitches on fabric.
Its firm lock also prevents the needle from breaking or loosening while stitching fabrics.
Okay, but where is it located?
The right location of a needle clamp screw is at the top of the needle holder/clamp. You can access it from the front side.
You have to rotate this screw counterclockwise to remove the needle.
Vice versa, rotate it clockwise to tighten the needle.
16. Needle Plate:

You may also know it as the ‘throat plate’ or ‘face plate’.
It looks like a semi-circular flat disc with a hole. You can find it below the needle. The needle passes through its hole when stitching.
This plate has a seam guide. This guide helps us determine the fabric edges while sewing.
It delivers thread from the top and through the project while the machine’s hook gets a hold of the thread to intertwine it with the bobbin thread
My secret behind sewing straight stitches:
I keep my eye on the seam guide instead of the needle while sewing!
17. Hand Wheel:

It is also called the ‘balance wheel.’
You may have seen this wheel in manual machines. I started learning sewing on my mom’s machine. It was fully manual. It had a belt connected to the foot pedal.

In manual machines, you have to rotate this wheel to move the needle up and down. Speeding up this wheel also speeds up the needle stitches.
18. Foot Controller:
It is also known as a pedal.
Manual pedals were so tiring for tailors. That’s why Isaac Merritt Singer introduced the first-ever practical foot-powered sewing machine in the early 1850s.
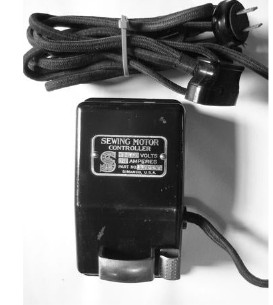
These foot pedals help us to control the sewing speed. We can freely use our hands to move fabric while stitching.

The machine moves faster when you press this pedal more downwards.
19. Reverse Lever:
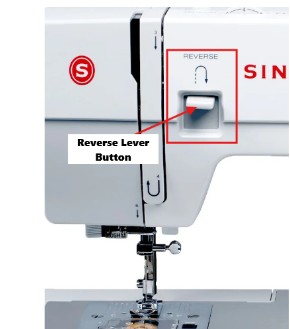
It helps to create a lock stitch or backstitch. It is located either at the front or the side of the sewing machine.
You have to press and hold it when sewing backward.
So, how should one use this lever?
Start with sewing first 3-4 stitches forward.
Now, hold the reverse lever button and sew 3-4 stitches backward.
Then, release it and sew forward.
20. Machine’s Light:

Many tailors like me like to work late at night. Are you also one of them? If yes, then your machine must have a light.
Many modern machines come with these tiny lights. They are attached above the needle bar. You can find this light below your machine’s arm.
This light has a power switch to turn the light on or off.
21. Stitch Selection Dial:

We can choose from dozens of stitch patterns using this dial. It is a round-shaped knob attached to the arm of the sewing machine. The shapes of these stitches are usually given around this knob.
You can sew stitches like straight, zigzag, lockstitch, backstitch, etc., using this part.
When you choose a pattern on this dial, it switches the needle movement for that stitch. If you have a manual machine, you must have seen a rotating knob to change the stitch pattern. It clicks in a place when you select a specific stitch.
This knob works in coordination with the stitch length dial. In advanced computerised machines, buttons are given to select stitch patterns. You can even sew embroidery stitches using these functions
22. Stitch Length Dial:

It is a small knob or lever that sets the length of a single stitch in millimeters.
It is numbered from 0 to 4 or 0 to 5. For e.g. number 3 on this dial means 3mm stitch length.
I generally use these stitch length settings while sewing different fabrics:
0 to 1:
It is a small stitch length. I use it for sewing lightweight or thin fabrics like satin or silk. I also use this setting to reinforce seams and create short, dense stitches.
2 to 3:
It is a mid-level stitch length. All tailors, including me, use this length for general sewing. It is ideal for fabrics such as cotton, rayon, polyester, etc.
3 to 4 or 5:
I use this setting for basting, napping, or sewing thick fabrics like denim or jute.
My Two Cents:
I want you to remember this if you really want to become a great stitcher. Learning about sewing machine parts is a must before learning about the sewing process.
Sewing is an art, and we need the right tools to pursue it. From the bobbin to the stitch-length dial, I have tried to cover all necessary parts.
I hope this beginner’s guide has given you helpful insights. Besides, If you need more help with these machine parts, you can email me with your query!
Till then, keep sewing, keep rocking!
FAQs:
1. What Is An ‘Arm’ In A Sewing Machine?
It is the curved hanging part of the machine’s head. This horizontal upper part of the machine contains the needle bar, tension disc, and thread guides.
2. How Many Parts Does A Sewing Machine Have?
This varies from the sewing machine model. Normally, a domestic sewing machine has 20 to 32 parts.