When Ryan was 12, he participated in a fancy dress competition. He wore a costume of the famous pirate, Jack Sparrow! He even prepared a small skit for this character.
A few minutes before his performance, the shirt button in the tummy area popped off loose. He was frantic. Being a sewist, I like to keep things handy. Fortunately, I had a small sewing kit in my handbag.

I immediately took him to the restroom and sewed the button. He was so happy to perform! And guess what? He won!
Yes, this skill is not only about work. It may help you in emergencies. If you are also wondering ‘how to sew a button’, this article is for you. In this guide, I have explained it in 9 easy-peasy steps. If you are a beginner, this is a must-have skill.
So let us go ahead and read it:
Gather These Tools For Sewing A Button:

- Needle: of course, the must! Get a thin one that can pass through button holes.
- Thread: It should be thin enough to pass through the needle hole. And yes, choose a thread that matches the garment or button color. You will need at least a 24-inch thread for this.
- Button: Use the original button that loosened. It can be two or four-holed. I have given an easy sewing process for both types.
If you lost it, look for the spare button inside that cloth. Almost all shirts, t-shirts, tops, jeans, etc., have it on a tag sewn at the bottom.

I collect these buttons if I have never used them for that clothing. This collection helps me sew buttons on other clothes that don’t have spares.

- Scissors or blade:
Keep small scissors or blades to cut the excess thread left after sewing the button. I sometimes use my teeth to separate this thread if I don’t have a cutting tool handy.
How To Sew A Button?
Step 1: Choose the Right Thread And Needle
I like to double the thread for making strong knots. So that button will not pop off easily next time.
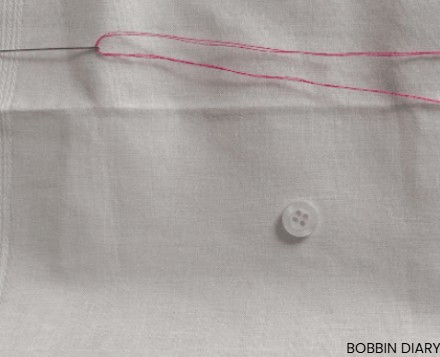
Remember that the needle should pass through the button holes. If your needlehole is smaller, it’s okay to keep a single loop of thread.
Step 2: Pass The Thread Through the Needle-hole
Pass the thread through the needlehole. Adjust it to get two equal ends.
Wrap the thread ends around your fingers and roll them between your fingertips. You will get a loop. Make a knot to tie these thread ends.
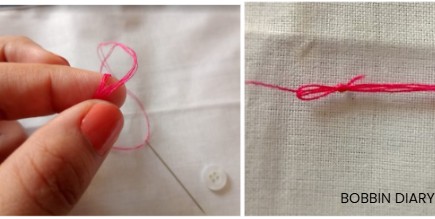
If you don’t know how to tie, you can wrap the thread around your finger for sewing.
Step 3: Mark an ‘X’
First, place the button on the fabric where you need to sew. Mark that point using fabric chalk.
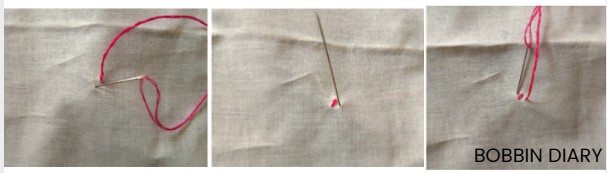
Pass the needle from the back to the front of the cloth, piercing through in the centre of this point.
Now pass the thread through the backside. Again, thread the needle from back to front until you form an ‘X’ mark. Officially, this thread mark is called the ‘anchor’. It’s where we will thread the button. It’s a must-step for beginners.
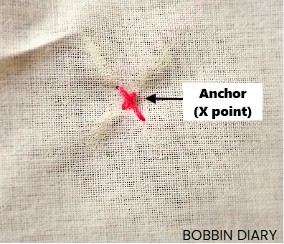
Eventually, with enough practice, you won’t need to make anchors. You will be able to guess the right spot and start sewing.
This X acts as a thread padding. It ensures the thread does not loosen while sewing the button on it.
Step 4: Pass The Threaded Needle Through The Button
Put the loose button on the ‘X’ mark.

Always start sewing from the back of the fabric. Pass the needle from back to front, going through the hole. Now, pass from the next hole from front to back.
Continue this process for 6 to 8 passes until it is firmly fixed on the cloth.
In this way, we sew two-hole buttons.
Step 5: Sew The Button With Cross Or Parallel Stitches
But what if you have a 4-holed button? Here is how to sew it:
1. Cross:

Start sewing in an ‘X’ pattern to get diagonal stitches.
Pass the needle from back to front through a hole. Then pass it from the diagonally opposite hole from front to back. Now, do the same for the remaining holes.
2. Parallel:

Start sewing in a ‘square’ pattern to get parallel stitches.
Pass the needle from one hole to the front. Then, instead of a diagonal hole, pass the needle from the hole parallel to the first one.
After passing this needle from front to back, pass it through the third hole (one at a 90-degree angle to the second hole). Keep sewing until you get a square stitch.
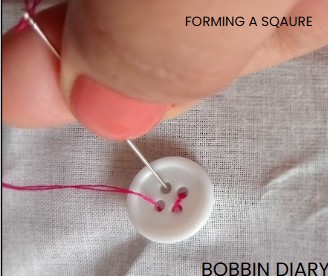
Sew for at least 6-8 passes for both square and cross stitch to secure your button on the cloth.
Pro-tip: Do not sew the button too tightly. Keep it firm enough. It must be smoothly closed.

Step 6: Tie the Thread
Pass the needle through the fabric to the back. Do not pass it through the buttonhole. In this way, you are creating a strong neck for your button.
Now, push the needle back and pass it through the stitches 3–6 times.
Once done, tie a knot with this thread to lock it. Cut excess thread using scissors or a blade.

But, Can You Sew Buttons On A Sewing Machine?
Of course, yes.
This is an easy method to sew many buttons in less time. However, you need to know how to operate a sewing machine first.
You can use a button sewing foot on your sewing machine. Set the stitch length to 0 and sew the button with zigzag stitches.
I believe hand sewing is always better! Yes, it takes time, but manual errors are fewer here. And you can shift to any button using any thread you like! It’s like FREEDOM!
Here is how you do it:
Key Takeaways:
Learning how to sew a button is a first step into the sewing world! Always color coordinate the thread and button with the cloth. So, it will look pleasant to the eyes.
Remember to keep the necessary tools handy. I like to keep a small box containing scissors, thread, various needles, and spare buttons of many colors. So, whenever you have a loose button emergency, you can be the savior!
This process is easy. All you need is PRACTICE, especially if you’re a beginner.
If you have any new tricks or tips for sewing these buttons by hand, I would love to hear about them! Mail me!
FAQs:
1. How To Sew A 1-hole Button?
Such a button is called a ‘shank-button’. To sew it, double the thread and pass it through the needle hole. Tie a knot at its end. Make an ‘X’ mark and put your single-hole button on it. Pass the needle from back to front through this mark. Pass it from the buttonhole. Then push it back to complete the stitch loop. Repeat it to make 5-6 loops. Then, tie the thread at the back and trim the excess thread.
2. Which Buttons Are Strong? Plastic or Metal?
It depends on your use. Generally, metal buttons are stronger than plastic. But, good-quality plastic buttons can also last for years if maintained properly.