Before learning to sew, I thought a sewing machine needed only one presser foot. I was wrong. Yes, a universal presser foot can do most of the work. However, a specialized foot for a specific sewing task can make your project more beautiful!
As a seasoned sewist, I have collected more than 30 presser feet. The more, the merrier! I use them in my studio.
If you know sewing, you may have heard of must-have presser feet like the universal foot, snap-on foot, zipper foot, and buttonhole foot. But what actually are presser feet? What are their types? How can you use them in sewing?
From beginner-friendly to must-haves, I cover all important sewing feet. So, let us get started.
What Is A Presser Foot?
Many people confuse presser feet with the shank. Are both parts really the same? Not exactly. A presser foot is a small metal part that is attached near the needle.
Role of A Presser Foot:
- The presser foot adds pressure on the fabric for easy feeding.
- It keeps the fabric flat.
- It feeds the fabric evenly.
- It prevents puckering of fabric.
- It keeps multiple fabric layers in one place. So, you can sew straight, curved, or zigzag stitches without missing any layer.
First, Know The Parts Of A Presser Foot:
If you know the anatomy of any part in any machine, you can understand and tackle its issues.
So, before explaining the types of presser feet, I will talk about their parts:
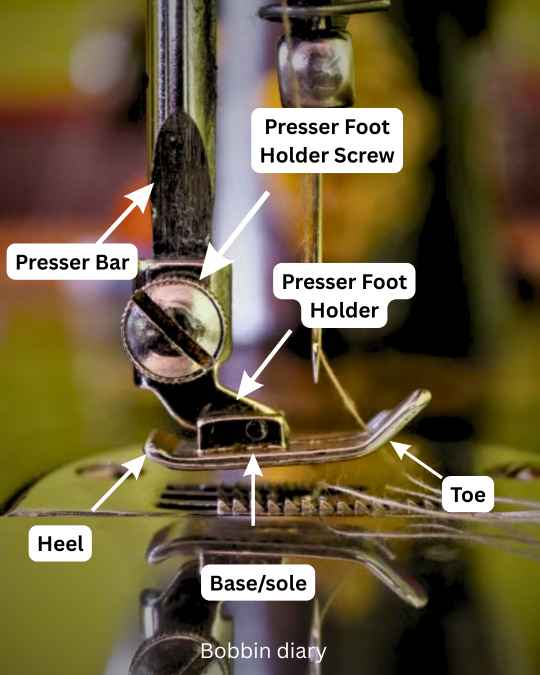
1. Shank:
It is a small metal bar (mounting frame). It connects the presser bar to the presser foot.
You may observe that some machines have either
- Low shank
- High shank.
- Slant Shank
- Snap-on vs. screw-on feet
1. Low Shank:
It has a 1/2 inch (0.5″) height from the sole to the presser foot screw. Most modern and domestic sewing machines have a low shank. Most domestic sewing machine brands like Kenmore, Viking, Brother, Juki, etc. have these shanks
2. High Shank:
This shank is used in older (vintage) and heavy-duty industrial machines. For e.g. single-needle lockstitch industrial machines like Juki DDL, Janome 600 P, Janome TL series, etc., machines have these shanks.
This foot measures 1 inch (25 mm) from the base to the center of the presser foot thumb screw.
3. Slant Shank:
My grandma had a Singer 500A machine. It had a slant shank. It also measured ¾ to 1 inch from the bed to the screw.
Many Singer models, such as 301, 401, 600, and 700, had slant shanks in the 1950s to 70s. These machines had a slanting shank in the front.
4. Snap-on vs. Screw-on Feet:
Low shank machines use a snap-on system. However, high-shank machines use a screw-on system. Let us see the real meaning of these shank styles:
Snap-on Foot (Clip-on Foot):
This type of presser foot has a spring-loaded click. It includes a small metal bar clipping into a spring system in the foot holder.
This system has a small lever or tiny release button to drop the foot.
I like the snap-on foot because you can attach or remove it without any tools.
Screw-on foot:
You can fasten this foot into the holder using a small metal screw. Many heavy-duty machines use these feet.
Many specialized feet like walking feet, ruffling feet, darning feet, and binding feet use these setups.
2. Heel:
This is the back part of the presser foot. It holds the fabric from the rear side.
3. Base/ Sole:
This is the middle base part of the presser foot. This part presses the foot down against the fabric and the feed dogs.
4. Toe
This is the front part of the foot. The fabric meets this part first. It guides the fabric forward without puckering.
How To Choose the Right Presser Foot?
Types Of Presser Feet According To Their Uses:

This is my set of presser feet from Juki. You may not need all of these at first. I suggest beginners work with the basic presser feet. Then, get the full set.
1. Presser Foot For Beginners:
1. Universal Presser Foot:

This is a 3-IN-1 FOOT that helps with stitching fabric in quilting, hemming, and decorative work like pintucks, gathers, etc.
One tool- many purposes!
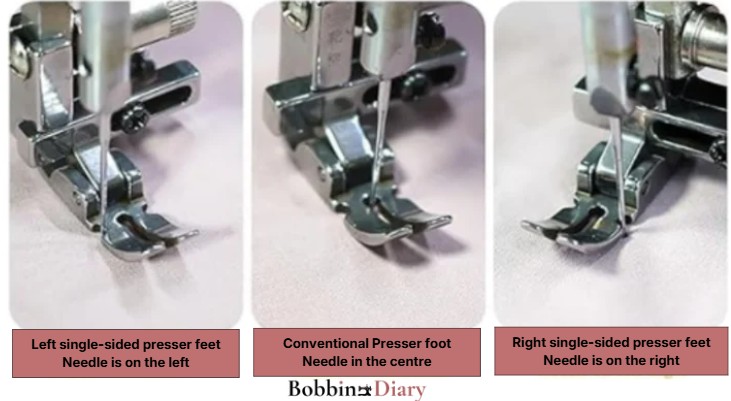
This foot is compatible with domestic and low-shank machines. So, it is a MUST-HAVE!✅
The adjustable universal foot has movable guides. When I need even stitching at the top and edges, this foot is my GO-TO tool!
You must know these characteristics of the universal presser foot:
- It has a wide opening. So, you can set the needle at different positions for smooth zigzag stitches.
- It is made of durable metal or plastic. So, you can use it for years without worrying about breakage.
- It gives a professional finish for decorative work like embroidery.
2. Zipper Foot:

Do you want to change the zippers of your pants or sew a handy pouch?
If yes, then a zipper foot will help the most!
This foot guides the needle to stitch next to the zipper. I also use it to add piping in the seams.
3 Types Of Zipper Feet:
You may not have all three feet in the beginning.
Start with one, practice, and then get the next one. Here are three zipper types that I suggest to everyone:
1. Standard Zipper Foot:
It has notches on the left and right. It is commonly used in domestic machines.
2. Adjustable Zipper Foot:
This foot is used in heavy-duty and industrial machines. This foot is compatible with many low-shank machines. It has four main parts: a slider, foot clamp, screw for the slider, and needle indent.
3. Invisible Zipper Foot:
This foot has parallel grooves at the bottom. It holds and unwinds the invisible zipper’s coil for stitching.
3. Buttonhole Foot:
This foot can create buttonholes consistently!
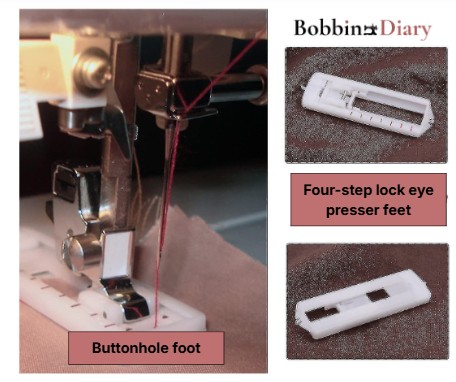
It has a sliding tray on the back side to hold the button. It measures and sews an exact-size buttonhole in the fabric.
This sliding tray is operated automatically or manually. If you have an automatic machine, pull the buttonhole lever downwards.
Push the pedal. Your machine will automatically stitch the hole. It will also stop automatically after it finishes making the hole.
4. Seam Foot:

This foot is best for adding straight seams with precision. This 1/4-inch (0.65 cm) long foot has a simple guide on its right edge.
Due to its distinctive length, it is also known as the ‘quarter foot’. Apart from a quarter foot, a seam foot can be adjustable or come without guides.
The small hole on this foot keeps thin fabrics neat and flat. It prevents the fabric surface from being pulled into the needle plate while stitching.
5. Blind Stitch Hem Foot:

This foot helps add blind stitches. It keeps the fabric tucked at one spot until the needle adds stitches.
It gives a smooth edge without a visible seam. The adjustable blind hem foot has a metal screw.
It moves the marking guide left or right.
2. Presser Feet for Tricky Fabrics:
1. Walking Foot:
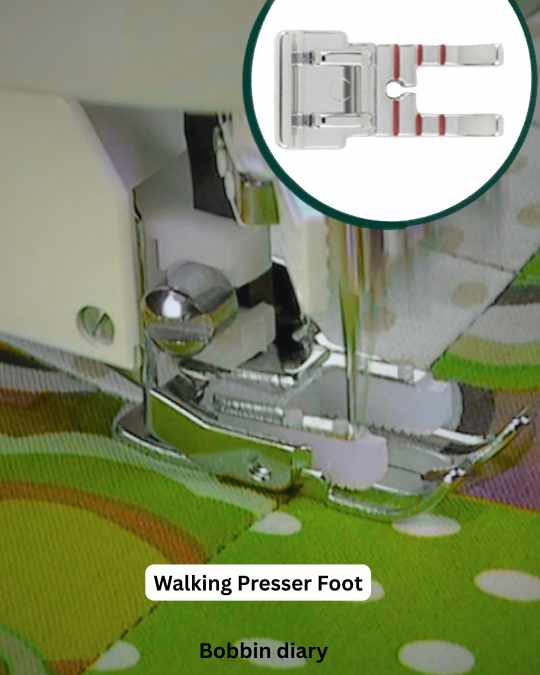
Do you want your fabric to move at the same speed as the machine’s bottom feed dogs? If yes, then a walking presser foot can definitely help!
Properly aligned fabric layers are a must, especially in tricky fabrics. Many fabrics get dragged or lag while adding stitches. This foot prevents such mess.
Use This Foot When:
- For sewing slippery fabrics like satin, silk, organza, etc.
- To add pleats, strips, and other elements to knits, jerseys, spandex, etc.
- To prevent wavy seams in such tricky fabrics. The base of this foot is designed to avoid distortion of fabric layers.
- To sew quilts and garment patchworks.
2. Teflon Foot(Non-stick Presser Foot):
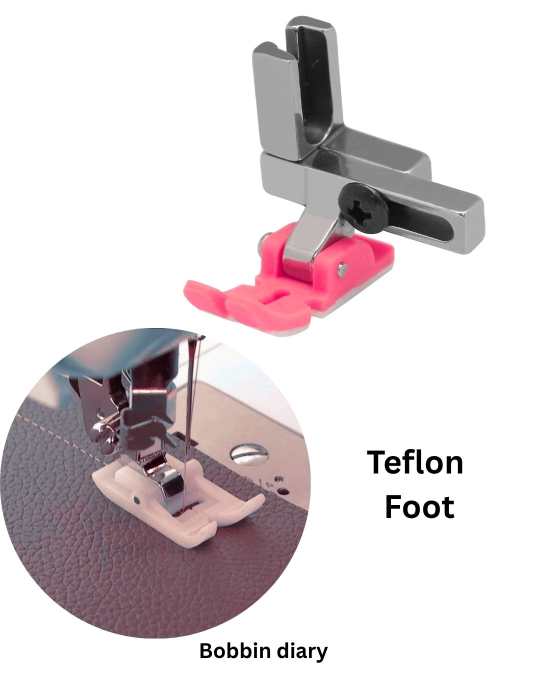
A Teflon foot is used to sew materials like leather, vinyl, and faux leather.
If you try to sew such materials with a normal walking foot, they may not move forward. Its metal body drags the difficult fabric or even skips stitches.
However, a Teflon foot is a suitable option in such cases. Its slippery base perfectly glides these materials under the needle. So, the fabric doesn’t stick.
This foot has a special low-friction and wear-resistant surface. It lets tough materials move smoothly.
It improves fabric feeding without skipping any stitches.
Use A Teflon Foot To Sew:
- Suede, rexine, or fuzzy surfaces.
- Plastic-coated surfaces like PVC, vinyl, etc.
- Laminated materials.
- Waterproof materials (fabrics of raincoats, umbrellas, shed covers)
- Napped fabrics like Velvets, Velveteen, Velour, Chenille, etc.
- Foam
It can be used as a universal foot for such special fabrics.
Avoid using a Teflon foot for sewing very delicate fabrics like silk, satin, viscose, lyocell, Cupro (Bemberg), etc. These fabrics are so slippery that they can slide off seam markings and pucker.
3. Roller Foot:
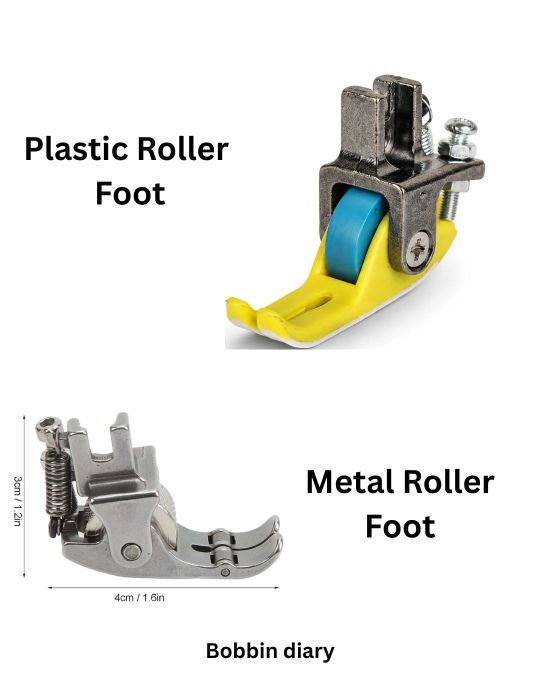
This foot is perfect for sewing slippery fabrics like silk, satin, chiffon, viscose, and suede.
I love this foot because it can sew uneven, napped, and stretchy fabrics. I have 3-4 of these feet in my collection. It can be made of metal or plastic.
The non-sticky roller attachment prevents excess drag while sewing.
The cylindrical roller in this foot offers grip and easy gliding. It glides over hard materials like leather, denim, faux leather, vinyl, suede, etc.
4. Overcasting Foot:
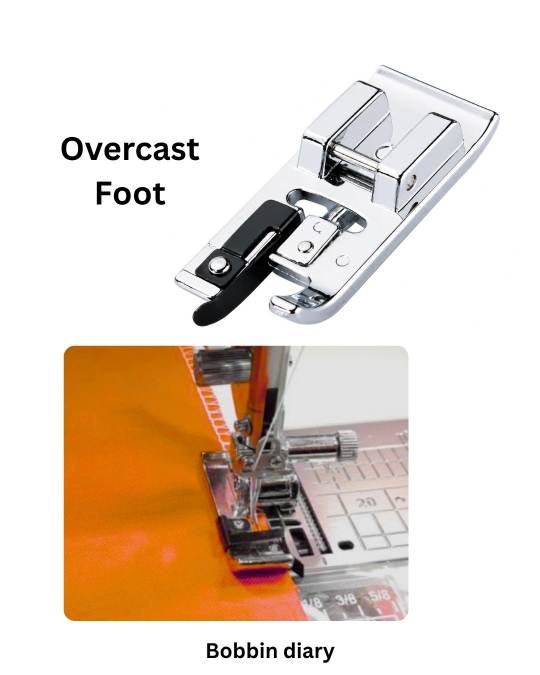
This foot prevents fraying on raw edges. It is also called the ‘overedge’ or ‘overlock’ foot.
It wraps the stitching thread around the fabric’s edge to stop unraveling.
So, your seams look professional, just as with a serger.
It has these three main parts:
1. Edge Guide:
It’s the toe on the side of the foot. It sits on the fabric edge to guide it for even stitches.
2. Central bar:
This tiny metal bar runs down the middle of the foot. The edge drops off when the needle goes to the right. And the thread wraps over the central bar.
So, this avoids too-tight stitches or fabric puckering.
3. Stitch options:
You can sew straight, zigzag, multi-zigzag, or specialized overlock stitch using this foot.
3. Presser Feet for Quilting:
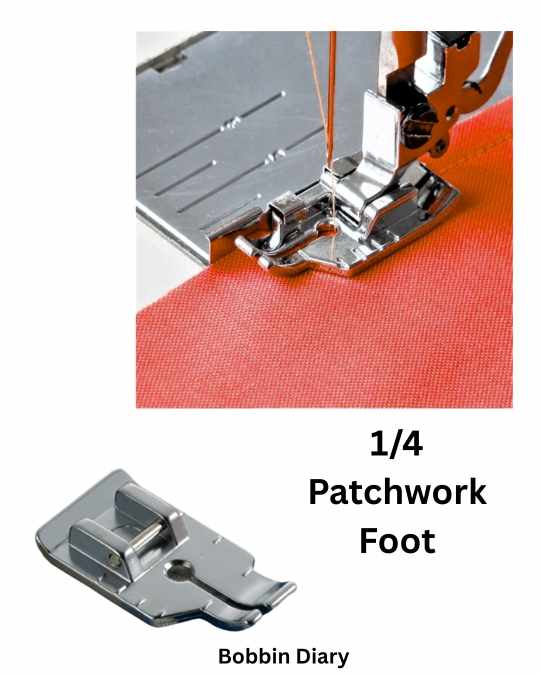
1. 1/4 inch Patchwork Foot:
It is also known as a ‘quarter-inch quilting foot’.
As its name says, this foot gives you an exact 1/4-inch seam allowance on quilts and patchwork blankets.
2. Darning Foot (Free-motion Foot):
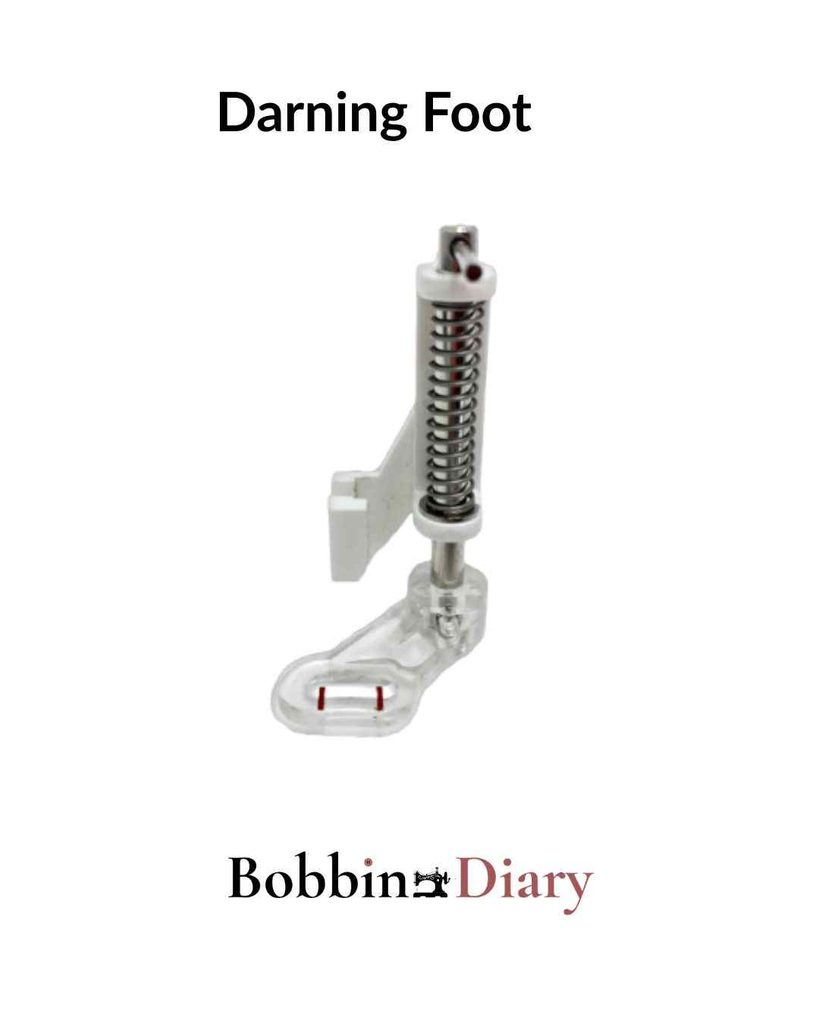
It is great for doing free-motion quilting and freehand embroidery. You can lower or lift this foot to move fabric in any direction.
It also helps to mend fabrics and adds decorative embroidery to clothes.
4. Decorative Presser Feet: Some Special Ones!
1. Cording Foot/ Piping Foot:
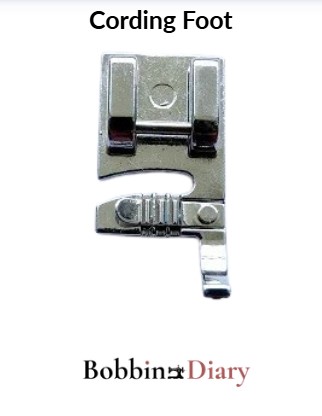
It helps to stitch three or more fine cords or braids. It adds a 3D decorative texture to cushions, napkins, curtains, etc.
This foot is also known as a ‘piping foot’. Being a sewist, adding ‘piping’ to garments is my favourite task!
This foot strengthens and styles edges. Let us see how it works:
1. Underside Groove:
This foot has a deep groove on the underside. It may have one to two channels, which hold the cord and fabric while stitching.
2. Cord Size:
Always set the cord size before piping. Most domestic sewing machines have cord size up to 5 mm. This is a standard size and looks really pretty on garments.
3. Cutout:
You can position your needle near the cord and fabric using the cutout orientation. It is on the left or right side of the foot.
2. Beading and Sequin Foot:
Who doesn’t love a slight bling on clothes?
It brings a vibe and a beautiful look, especially on skirts, tops, purses, etc.!
A beading foot adds these blingy embellishments to the fabric. You can sew bead strings, cords, pearls, sequins, feathers, and laces.

It guides the bead strand into the groove on its underside. Set the machine to a zigzag stitch with 3 to 4 mm. This length depends on the size of the beads or embellishments you are using.
Also, the bead size must match the foot’s groove (tunnel or channel) size. Do not push or pull the fabric or strings.
I always use monofilament thread to make the stitches invisible under the beads. This improves the garment’s overall blingy appeal. If you don’t have monofilament thread, use thread matching the fabric.
3. Gathering and Ruffling Foot:
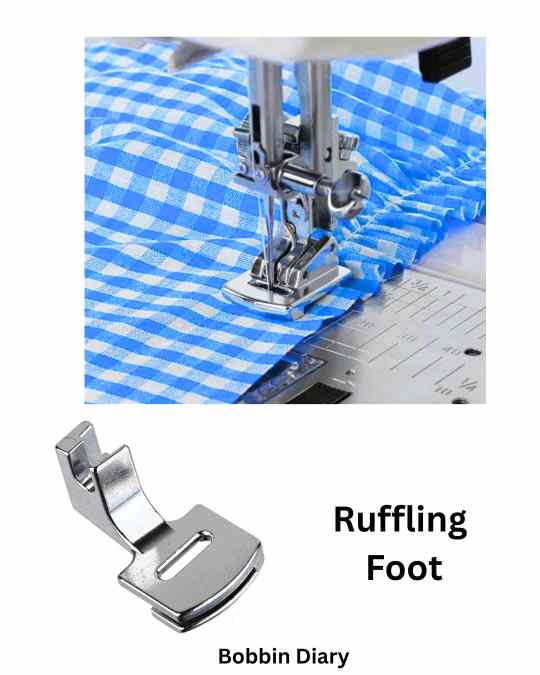
This foot helps to sew beautiful ruffles and pleats. It sews ruffles of any size at even distances for a smooth finish!
You Can Add Ruffles In 3 Ways Using A Gathering Foot:
1. Single Layer:
The gathering foot picks up a single piece of fabric to add ruffles.
2. Simultaneous Layers:
The foot picks up the bottom layer of fabric and attaches it to a second fabric layer. So, you get simultaneous layers. In many cases, the top layer is flat.
3. Shirring:
Shirring is useful if you want stretchy ruffles.
Add elastic thread in the bobbin. The rest of the process is the same.
So, you sew stretchy ruffles using this foot.
PRO TIP: Set your machine to a longer stitch length- 4 to 5 and tighten the thread tension. This setting offers voluminous ruffles with a fluffy look!
4. Pintuck Foot:
Want to add some art to your fabric? A Pintuck foot can help you!

This tiny foot helps create pintucks with a double (twin)needle.
You need to increase the tension slightly, depending on the fabric, to get those smoothly finished tucks.
It is suitable for adding tucks to lightweight to medium-weight fabrics, such as silk, satin, georgette, organza, etc.
5. Rolled Hem Foot (Narrow Hemmer Foot):
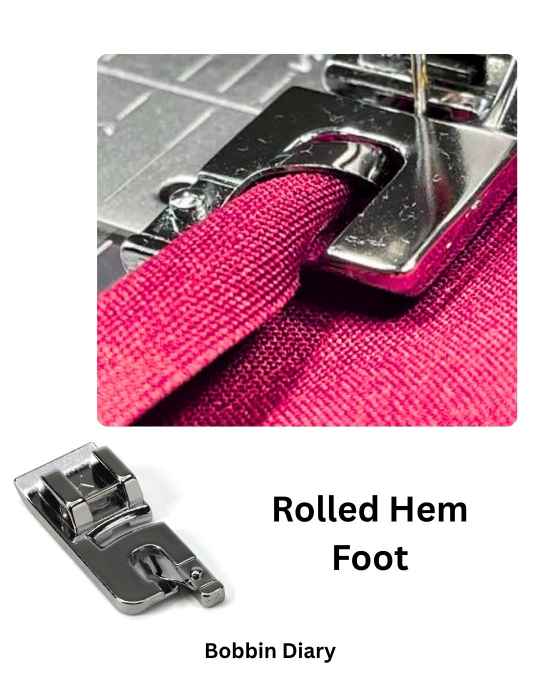
A rolled hem foot automatically folds and turns under the fabric edge twice. This process forms a tight narrow hem.
You Can Use A Rolled Hem Foot:
- To add curved hems on a variety of sewing projects like blouses, round skirts, crew neck tops, crop tops, scarves, etc.
- To add professional hems on delicate fabric like silk, satin, chiffon, rayon, etc.
Pro Tip: Always set your machine to a standard straight stitch (length around 2.5 mm, width set to 0). You can use any rolled hem foot- snap-on or screw.
6. Binder Foot:
As its name suggests, it easily binds two or more pieces of fabric.
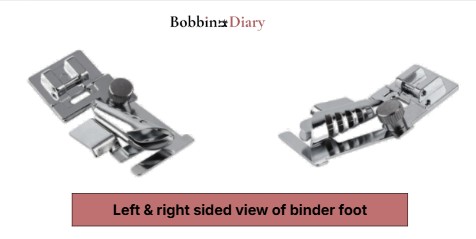
A binder foot joins bias tape in a single step when quilting. This prevents unnecessary fabric fraying. It keeps the binding folded while sewing.
Feed the fabric in the gap between the U-shaped legs of this foot. And start sewing. It will automatically start binding.
Which Presser Foot For Which Task? A Quick Comparison Table:
| Presser Foot Type | Use It For These Sewing Purposes |
| Universal | Everyday sewing tasks |
| Zipper Foot | To install standard zippers and sew invisible zippers |
| Buttonhole Foot | To create aligned and uniform buttonholes |
| Binding foot | To fold and bind the bias tape to the fabric’s edge |
| Roller Hem Foot | To fold and turn under the fabric edge twice & form a hem |
| Seam Foot | To sew clean seams with a 1/4 or 1/8 allowance. |
| Pintuck Foot | Pairs with twin needle to create equal fabric tucks. |
| Blind Stitch Hem Foot | To create invisible hems on skirts, shirts, pants, etc. |
| Beading Foot | Adds strings of sequins, beads, pearls, etc., on fabric using zigzag stitches. |
| Cording Foot | To stitch pipings, tiny threads, fine cords, etc., on fabric. |
| Darning Foot | To sew embroidery (with free motion) |
How to Choose the Right Presser Foot for Your Project?
It can feel amusing at first to choose from many presser foot types. Some feet may not be compatible with specific machines.
Or, some feet may not work on your machine.
To resolve this issue, I have given a quick checklist for you:
1. Match The Foot To The Fabric Type:
Different fabrics require different feet.
For e.g. A Walking foot is useful for stitching simple fabrics like cotton, rayon, etc.
However, a Teflon foot is specifically used to sew leather, plastic, or laminated material.
2. Choose The Foot According To The Technique:
Sewing involves adding sequins, beads, embroidery design, and more.
Each of these techniques needs individual feet, like:
- For adding piping: piping foot
- For adding sequins, beads, and pearls: beading foot
- For adding embroidery design: darning foot
- For sewing tough material like leather, canvas, vinyl: Teflon foot
How to Change a Presser Foot? A Step-by-Step Quick Guide!
You do not need to change a presser foot for every stitch type.
But if you are changing fabric or technique, you need to change it. So, suppose you are in the middle of sewing. And you need to add lace or patchwork on the fabric. How will you do it?
You will need to change the presser foot. Here is how you do it:
1. Snap-on foot:
- Turn off the sewing machine.
- Raise the needle gently.
- Lift the foot.
- Click on the latch/ clip to release it.
- Attach the new foot in its place.
2. Screw-on foot:
- Switch off the sewing machine
- Raise the needle.
- Use a tiny screwdriver to unlock the screw-on foot.
- Remove it and attach the new one.
- Fix it using the same screwdriver.
Presser Foot Care & Troubleshooting:
A presser foot is a part of a sewing machine. So, it also needs timely care and maintenance.
How To Clean A Presser Foot?
- Turn off the sewing machine.
- Raise the needle and remove the presser foot.
- Pour a few drops of sewing machine oil on the presser foot.
- Many feet have stuck fabric residue, adhesive, or sticky oil. Oil helps to loosen this debris.
- Let the oil sit there for 3-5 minutes.
- Use a soft, damp cotton towel to wipe the debris and residue oil off the presser foot.
- Let the feet dry completely. Then, reattach it to the sewing machine.
- Do this cleaning process once a week, so your presser feet stay in the best condition.
7 Signs of a Damaged or Wrong Presser Foot:
If you are using a presser foot for too long, or using the wrong foot for a sewing requirement, it will show these signs:
- The stitches will skip.
- The fabric will pucker.
- The frayed edge will be visible if you use a damaged piping foot.
- The stitches will look uneven.
- The presser feet will make a clunky noise when you remove or attach.
- The feeding will be uneven.
- The ruffles, laces, or pleats will be uneven or loose.
4 Common Presser Foot Mistakes to Avoid As a Beginner:
You may make these mistakes when using a presser foot as a beginner. I did them too.
Here is what to avoid:
- Choosing the wrong foot for a specific stitch width.
- Using the wrong foot for a specific fabric type.
- Choosing the wrong shank type for a specific foot.
- Forgetting to lower the presser foot before you start to sew.
My Two Cents:
Presser feet ensure firm stitches without puckering fabric. All you need to know is how to operate them properly! Whether it is a universal foot, a seam foot, or a beading foot, each one has its own uses.
I suggest a universal or a regular foot for beginners. They are reliable and very easy to handle. I hope this guide on ‘types of presser feet’ has given you useful insights. You can start with any basic foot, like the walking, regular, universal, or zigzag foot.
All work with the same basic mechanism. Just lift the lever, attach or replace the presser feet, and start stitching! You can collect more feet as you get proficient in sewing.
Which presser foot will you use? Do let me know in the comments!
FAQs:
1. Which Is The Most Useful Presser Foot In Sewing?
The all-purpose foot, aka standard Zigzag (‘J’) foot, is the best overall. Beginners can easily use it for most stitching projects. A universal foot is ideal for general sewing, topstitching, and other projects like quilting.
2. Why Is A Presser Foot Necessary in a Sewing Machine?
Without a Presser foot, the fabric can pucker and be damaged. A presser foot is a must to get aligned, even, and firm stitches.
3. Do You Need A Presser Foot Kit From the Beginning?
No. It depends on your sewing needs. If you are a professional tailor, you can use the whole kit. If you are a beginner, start with basic feet like the walking foot, universal foot, etc.
4. What is the Difference Between A Regular & Walking Presser Foot?
A regular presser foot depends on the machine’s bottom feed dogs to move the fabric. So, it is useful for single-layer and basic sewing projects. A walking foot has built-in top feed dogs. So, it moves in sync with the bottom feed dogs. It offers suitable grip and gentle pull on fabric layers for uniform stitches. So, it is useful for multi-layer sewing like quilting, patchwork, etc.