Has your sewing machine stopped while stitching? Have your machine’s needles ever gotten stuck?
I have been using a sewing machine for more than 30 years. And, I went through every possible problem that can occur in sewing machines.
It can be the presser foot, needle, arm, motor, wheel, thread- anything. If you are learning sewing, avoid these sewing machine mistakes. I have listed out the most common 6 issues that you in sewing.
So, let’s learn more about them.
Avoid These 6 Mistakes While Operating a Sewing Machine:
1. Using Wrong or Dull Needles:
Needles are the most common reason behind these mistakes. I always tell my students this: a malfunctioning needle can mess up the stitches and fabric badly.
But what’s a malfunctioning needle?
- It can be bent
- It can be dull
- It can be broken
- It can be of the wrong type or size.
If you are using either of the above needles while sewing, stop ASAP.
Solution:
Do not panic if your fabric or stitches are ruined. It happens with all beginners. Remember, we all learn from mistakes. Just look after the issue. Change the needle if it is damaged, broken, or dull.
Always and always- check the needle size code and color band. And choose the right needle type for your selected fabric.
Popular brands like Shemetz, Brother, Singer, etc., offer needles with specific color codes- these color bands indicate the ideal fabric on which you can use them for sewing.
During the learning period, you can use a simple ballpoint or universal needle for practice.
As you get trained in sewing, you can shift to different needle types.
2. Operating Needles Improperly:
Have you ever seen skipped stitches?
You may have overused your needle more than expected.
Solution:
To avoid this issue, always change your needle after each sewing project.
Also, change the needle after every 6-8 hrs if your sewing work is long. Always insert your needle correctly. And, screw it tightly so it won’t loosen when you sew.
This not only saves your fabric but also saves your machine from a dull or bent needle.
3. Pulling Or Pushing Fabric While Stitching:
As a beginner, I used to think that if I didn’t pull or push the fabric while stitching, it wouldn’t move. Like me, many beginners experience this. It may be our nervous system or the way we think.
Solution:
After so many trials and suggestions from my mom, I learned NOT TO PULL/ PUSH THE FABRIC EVER. Because doing this tears the fabric and destroys its smooth finish.
Just trust the feed dog and needle settings. And let the fabric move smoothly without any hurdle.
Note: If your fabric gets stuck while sewing, it means you have not set the feed dog properly. Check and set it correctly.
4. Threading The Machine Improperly:
Have you ever seen a thread tangled in the needle of your sewing machine? Or has your machine’s stitch quality ever decreased?
Such issues are mostly caused by improperly threading the machine. Such threads may snag and snap frequently. A jammed, tangled thread can also cause the needle to bend or break.
The machine may not pull the thread back up if the top thread does not pass through the take-up lever or the tension disc. This incorrect threading results in tangling above or under the fabric.
Solution:
To avoid this, always follow the proper thread path before starting.
1. If you set the tension too tight or the bobbin is loose, the stitches may gather on the top of the fabric.
2. If the top tension is too loose, then the stitches appear loopy on the bottom.
3. If you are also facing the same issues, adjust the tension and try adding stitches on a scrap fabric.
And, lift the presser foot to open the tension discs before you start threading.
5. Using Or Winding The Bobbin Incorrectly:
The thread mostly jams due to the wrong bobbin types or improper winding.
If the bobbin thread does not get caught in the tension spring, it will not be stitched with the bottom thread. And, it results in skipped stitches, puckered fabric, or thread tangling.
Solution:
Always wind the bobbin properly. Make sure there are no loose thread tails.
The bobbin thread must be caught in the tension spring.
Always wind the thread from underneath. It gives a tight tension. Also, use the correct spool cap for the suitable spool size.
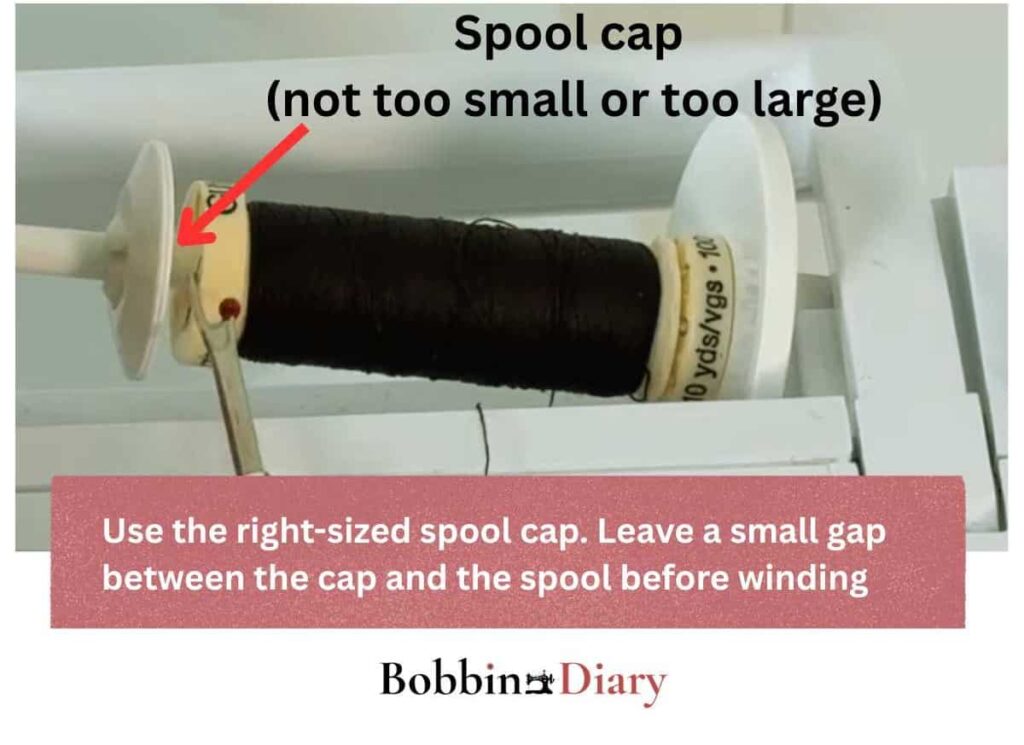
Before winding, make sure the thread passes under the hook and through the tension disc tightly.

Once you wrap the thread around the bobbin 6-7 times, tuck it under the shaft. Move the shaft to the right and set the speed to medium. After pressing the ‘start’ button, the bobbin will wind.
It slows down when it winds completely. Move the shaft to left and remove the bobbin.

6. Using an Incorrect Presser Foot:
One of my students asked me, ‘What happens if you use a zig-zag foot for straight stitches?’
Many beginners often get this question. Well, the answer to this question is- ‘the needle may break due to hitting the foot.’
I have seen some students using the wrong presser foot in their learning days. This mistake often snaps the needle, damages the needle bar, bobbin case, or tears the fabric.
Solution:
Use the right presser foot for the respective chosen needle.

The presser foot is one of the most essential parts of a sewing machine for getting neat stitches. Your machine’s needle, fabric, or thread gets damaged if you use the wrong presser foot.
Key Takeaways:
I hope you have understood the common sewing machine mistakes that can happen. It happens in the beginning mostly. Know the type of your machine’s shank, the needle requirement, and the right parts. This will help you to keep possible mistakes at bay.
Make sure you have set all the parts correctly. Also, clean the machine to avoid thread jamming and unnecessary damage.
If your machine suddenly breaks down and you are still unable to resolve the issue, seek help from professionals.
What issues did you face due to such sewing mistakes? Do let me know in the comments.