I always saw my grandma adding raw stitches on fabric before sewing. She used to add long and loose stitches. One day, I asked her reason behind it. She said, “This is basting (they call it ‘Kachhi Silai’ in Hindi). If you want to hold multiple pieces of fabric together, you need basting.”
Her guidance really helped me align my final stitches on fabrics. I never missed any fabric layer. For all tailors, this is a skill that takes you one step forward towards perfection.
I hope you got an idea of what I will be discussing today! Whether you are stitching a shirt, blanket, curtain, or dress, you must know ‘What is basting?’. To help you with it, I have also explained its types, and alternatives.
Excited to learn? Let’s go ahead.
What Is Basting In Sewing?
As I said above, when you add temporary, loose, but long stitches on fabric layers to align them before final stitching, it is called ‘basting’. It ensures that you won’t stretch or miss the fabric layers.
You can say these are ‘rough stitches’. So, you can adjust fabric panels, seam lines, etc., before adding permanent stitches.
When To Do Basting?
If you are a beginner, you can add basting while sewing all kinds of clothes. I suggest it for your practice.
Experienced tailors mostly add these long temporary stitches when sewing more layered garments, quilting on a patchwork, etc.
What Are The Main Uses Of Basting?
I use basting and tacking for many purposes, such as:
- To gather multiple pieces of fabric
- To attach labels, tags, patches, etc.
- To attach garment layers to mannequins for proper fitting and design
- To transfer pattern marks on the garment.
- To make a Quilt’s Sandwich: Temporary stitches are added on the middle backing, lower batting, and top layer of fabric to make a quilt sandwich. Once these three layers are aligned with basting, the final stitches are sewn.
- To align fabrics, especially for zippers, necklines, skirts, pleated garments, etc.
- To hold puff sleeves, laces, nets, borders, etc., on women’s dresses.
- To hold upper layers of fabric on the main fabric of the garment before permanent stitches: to hold pockets, collars, and cuffs, a shoulder veil on a dress, etc.
- To keep zippers and trimmed fabric in one place.
- To hold the handles, straps, bottle nets, etc. for bags.
Best Alternative To Basting: Tacking
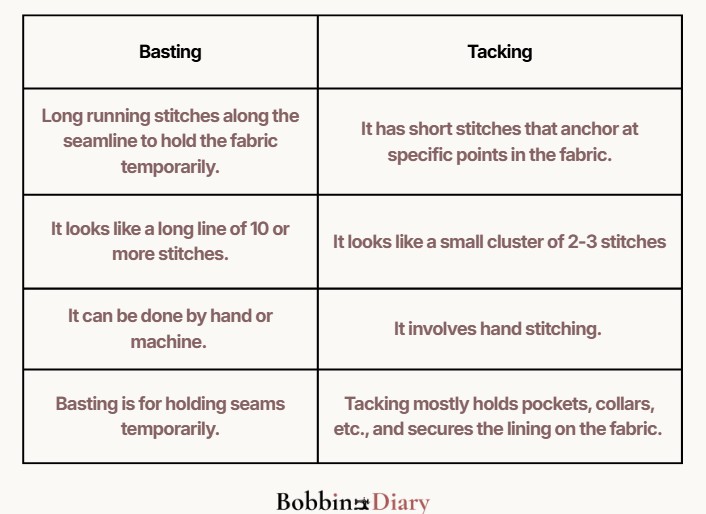
As a tailor, I used these two methods most frequently to temporarily fabric together. Some people call it ‘tacking’ too. But there is a slight difference between these two techniques. We will see that below.
Main Difference Between Basting And Tacking:
4 Types Of Basting And Tacking:
1. Running Stitch Basting:
These are long stitches sewn in a straight line. They can be hand-sewn or machine-sewn.
Applications:
- To hold zippers in one place.
- Fitting fabric on a mannequin.
- Gathering fabric in equal portions to make pleats, etc.
How To Sew Running Stitch Basting?
- We do this basting at the seamline. ‘
- Thread the needle and tie the ends of the thread.
- Pass the needle up from the back of the fabric.
- Keep the stitch length of 1-2 cm. Pass the needle down in the fabric.
- Again, pull it up and repeat the process. In this way, you are making long-running stitches.
- Add permanent stitches along the seamline.
- Now, you need to cut the thread knot in the running basting. Gently pull the thread to separate it from the fabric.
2. Diagonal Basting:
Imagine you have to sew a dress with multiple layers and veils. What keeps these layers together when the rest of the layers are being sewn? They are diagonal basting stitches.
Diagonal basting keeps the lining layers of fabric connected to the respective garment. So, you can complete sewing the remaining fabric layers.
These are long stitches placed diagonally to hold. So, they appear slanted at one side. I mostly make them from right to left. If you are left-handed, you can add them from left to right.
Short diagonal bastings are dense and offer more control on the fabric while sewing.
Applications:
1. To hold facings or interfacing of garments.
2. To hold slippery or large pieces of fabric together.
3. To pin-free lapels, hem edges, pockets, etc.
4. To prevent the shifting of fabric layers like collars, cuffs, sleeves, pleats, drapes, etc.
How To Add Diagonal Basting Stitches?
1. Thread the needle and tie the knot of the thread ends.
2. Sew a small horizontal stitch from right to left.
3. Push the needle downwards in the fabric. Move it to the right
4. Angle it diagonally about 2-3 cm above.
5. Pull the needle upwards.
6. Repeat the same process to add the first diagonal stitch on the top.
7. Continue to make multiple stitches as required for your fabric length.
8. Once you sew your garment layers, cut the thread knot of the diagonal stitch basting and pull the thread gently.
This basting is easy to remove. Hence, it hardly damages the fabric.
3. Bar Tack:
Bar tacks are short, narrow, and zig-zag in pattern. They are sewn on thick fabrics, such as denim, jute, cargo, etc.
Applications:
They are found on:-
- belt loops,
- zipper ends,
- fly openings,
- buttonhole linings,
- pocket edges,
- bag straps, etc.
These tacks add high stress to these areas.
The sewing machine’s needle offers uniformity in these bar tacks. Due to which they look thick and dense. These tacks are mostly 1/16 to 1/8 inch wide and 1/4 to 3/8 inch long.
Here’s How To Sew A Bar Tack On A Domestic Machine At Home:
- Choose the area where you want to add the bar tack.
- Using chalk, mark a 10 mm line at that spot.
- Select zig-zag stitch mode on your machine.
- Set the stitch length to 0.5 or less. And, the stitch width should be 2-3mm.
- Start sewing zigzag stitches over that marked line.
- Overlap the stitches 3-4 times to make them dense.
- Finally, secure these stitches using lock stitches
4. Tailor Tack:
These are similar to hand embroidery. Tailor tacks are mostly hand-sewn thread loops. They are used to add distinct patterns to the garment.
They do not leave any permanent residue after marking the pattern. Hence, they are used to mark pattern details, like skirt pleats, buttonholes, darts, etc.
Chalk marking is inconvenient on soft fabrics like silk, satin, velvet, etc. Hence, tailor tacks are used on such fabric.
How To Add Tailor Tacks?
I mostly use thin paper while making bar tacks. Here is how you can do it with my method:
1. Pin the paper and fabric together.
2. We need to hand sew tailor tack. Thread the needle using a soft cotton thread. Color can be contrasting.
3. Do not tie the thread ends. Now it’s time to stitch.
4. Push the needle down through the paper pattern and fabric,
5. Leave the thread tail of 1 inch.
6. Pull the needle back upwards at ⅛ inches away.
7. This creates a large thread loop of ½ inches on the top.
8. Again, add a second stitch at the same point.
7. You can add a small backstitch, too.
8. Make the loop again. This is how tailor tacks are done.
9. After making all the tacks, gently pull the paper to remove the thread stitches.
10. Cut the top of the loops.
11. You can mark two fabric layers at once, too. This is how:
- Keep one fabric on another, and then keep the paper on these layers
- Follow the same process.
- Separate the fabric layers.
- Cut the threads between them.
- This leaves small thread tacks on both fabric layers.
7 Important Measures To Take While Basting:
1. Don’t Overlap Baste Stitches:
Do not add permanent stitches over the basting thread stitches. This may damage the fabric while ripping out basting thread tails. To avoid this, baste slightly away from the main seamline. I prefer a ¼ or ⅛ inch distance between the actual seam and basting stitches.
2. Avoid Weak Threads:
Do not use a weak thread. While pulling, such a thread might break apart. It looks unpleasant on the fabric.
3. Keep Loose Thread Tails Whenever Possible:
Do not backstitch at the start or the end. Such bastings are very difficult to remove. They may even damage the fabric.
So, leave long thread ends instead of backstitching. They can easily hold the tension of fabric layers. And, they are easy to pull after final stitching.
4. Avoid Too High Tension In The Machine:
When you add basting using a sewing machine, do not keep the stitch tension too high. Such basting stitches are very hard to remove.
Instead, use regular tension settings as per your machine’s model. Set the stitch length to its longest. I usually keep it at 4 to 5 mm or higher.
5. Use Contrasting Thread Color For Basting:
I avoid using the same thread color as the fabric. Contrasting colored thread stitches are easy to locate. After adding permanent stitches, you can easily locate such a thread and pull it.
For e.g. if I am sewing a light pink fabric, I will use a dull green, brown, or black thread base for the seamline. Don’t worry if it looks ugly. The main logic is that it should be easy to find. In this way, you won’t miss any thread ends while pulling them.
6. Use Feed Dogs To Handle Basting On Delicate Fabrics:
Using the feed dogs of a sewing machine is an ideal way to handle stretchy, woven, knitted, or slippery fabrics when basting them.
You must add or remove baste stitches very gently on such fabrics. If you pull or push these fabrics while basting, you may disrupt their original structure. They may look wavy, too stretched, or uneven at seamlines.
Instead, I place them on the sewing table and use the feed dog to hold them. This helps me most when I am basting multiple layers of stretchy fabrics.
Sometimes, you may feel that you are not experienced enough to baste such delicate fabrics. So, use water-soluble threads at such times. In this way, you don’t need to pull them after the final stitches. Such basting stitches will automatically come out after washing the stretchy fabric for the first time. I use the Smart Solve water-soluble thread for such times.
7. Press Only After Removing The Basting Stitches:
This is a must-follow. Sometimes, we may press the seams after permanent stitches. But, DO NOT FORGET to remove the baste stitches before pressing.
Otherwise, if you sew fabric with basting, these temporary stitches flatten and may set in the fabric.
It becomes very daunting to remove such pressed stitches. It also distorts the flat fabric seam. So, you will have to press the fabric again.
Key Takeaways:
Basting is a way to make a rough draft for stitches. I hope this article helped you to understand how to add running and diagonal baste stitches. Both are useful in holding fabric temporarily.
Tacking is like a brother of baste stitches. Tacks have dense and short stitches. Tailor’s tacks help to add patterns to fabric. They are even and equal. So, those markings look more pleasant.
Make sure you follow the important measures that I have mentioned to get a perfect baste. Contrasting threads and ideal thread settings are the soul of this technique.
Do not worry if you do not get perfect bastes the first time. These things take time to master. Keep practicing. I have made this blog to help beginners and enthusiasts in sewing. So, if you still need more help with basting, feel free to reach out to me via email!
FAQs:
Which Thread Is Ideal To Add Basting Stitches?
Cotton thread is way better than polyester. It has better grip and usually does not slip while basting.