Last month, I conducted a sewing workshop in Tampa. We explored the types of stitches first. Then we moved to deeper techniques.
Many of them were beginners, and had the same question: ‘How do tailors stitch clothes fitting to curved body parts?’ I taught them my easy 3-step method to do this: Measure, Dart, and Cut!
Basically, our torso is three-dimensional. And, cutting and sewing a 2-D piece of fabric in these 3D planes needs techniques like darting. With darts, we can perfectly contour flat fabric around our curves. A dart is a V-shaped or wedge-like fold stitched into fabric.
In this article, we will learn ‘what is a dart in sewing?’, what its types are, and how to add darts in fabric. Do not worry if you are a beginner. I have explained the article in the same way as I did for my workshop students.
Just follow the steps, and you will learn it on the first try!
What Is A Dart in Sewing?

Do you know how we make a ‘cone’ shape from a flat square or rectangle? Or, consider the shape of the slice you take from the whole pizza. Cutting out a dart from the fabric looks very similar!
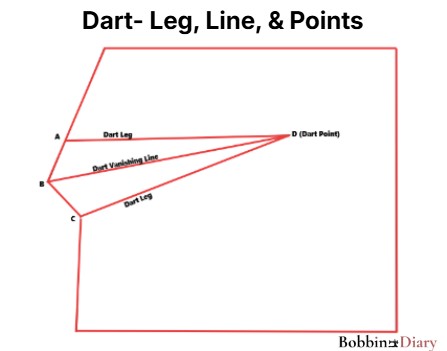
See the above sample image. Suppose it is a piece of fabric. You have to cut from Point A to B to C to D.
Then join point A to point C and stitch them together to narrow the fabric.
Tada, your basic dart is done! In this way, we cut and fit a flat woven fabric on the dimensional body parts.
Darts Have Two Main Parts:
- Dart legs: These are two stitched lines. In our image, the dart legs are lines AD and CD.
- Dart point: It’s the tip of the triangle. In our image, it is point D. This point is at the curviest part of our torso (like bust, hip, etc). This point guides the fabric to wrap around that body part.
- Intake: In the above image, the amount of fabric tucked between two legs (AD and CD) is referred to as ‘intake’.
5 Sewing Tools You Need For Darts:
You need basic sewing tools like:
- Scissors
- Measuring tape
- Ruler
- Fabric chalk or pen
- Fabric pins, etc.
4 Types Of Darts In Various Shapes:
The basic logic behind making darts is the same as I explained above. They come in different shapes and locations. Their sizes change from person to person. So, always measure each dart separately for two different people.
I have explained the dart types according to their shape below:
1. Straight Darts:
This is a single-point dart with a wide end. It is typically V-shaped with the other tapering end.
You can find such darts at the waist, armhole, neckline, or bust area of the cloth. They are useful for sewing skirts, pants, etc.
2. Double Pointed (Fish-eye) Darts:
It is also called a ‘body dart.’
It looks like a fish-eye or the shape of a diamond card: it has tapering ends, with the widest part in the middle.
This dart supports the bust and hip areas. So, the cut fabric can follow the body’s shape easily.
3. French Dart:
This elongated dart starts at the side of the seam near the bust. To shape the fabric in this area, it angles up toward the bust.
4. Curved Dart:
This dart is a little rounder than a straight dart. So, it can give a natural, round shape to curves in skirts, trousers, etc.
12 Types Of Bodice Darts In Sewing: For Dart Manipulation!
We place darts wherever our body has curved parts. It’s a kind of dart manipulation to create a fitted silhouette.
So, let’s look at each spot one by one:

1. Mid Shoulder Dart:
This dart starts at the midpoint of the shoulder seam, generally closer to the neckline. It bends slightly at the front and ends towards the bust point.
Its length will depend on your garment type. You may have to use them in princess-line blouses or tops.
2. Shoulder Tip Dart:
This is diagonal dart. It begins at the end of the shoulder tip (near the arm) and runs to the apex point as a diagonal line.
Due to its shape, this dart looks elongated. It makes our shoulder area look sharper and finer.
3. Mid Armhole Dart:
It begins from the middle front armhole curve and runs towards the bust point. It gives a subtle diagonal line on blouses and dresses. So, the bust line looks soft-shaped and fitted.
Tailors mainly use it to replace the traditional side seam on dresses.
4. Mid-neckline Dart:

As the name says, it begins from the neckline.
It offers a profound look at the neck area. I use it more for decorative purposes on my designs.
5. Centre-front Neck Dart:
It is a V shape tapering fold at the centre of the neck. It starts from the centre of the neckline and ends at the bust apex.
This dart gives a more well-shaped look than a side-seam dart. It can be horizontal or vertical.
Horizontal centre-front dart starts from the middle of the neck (front side) to the bust. It is mostly used in fitted garments such as blouses, dresses, etc.
And, the vertical dart begins from the neckline towards the bust point. It runs diagonally to give a contouring effect.
6. Standard Waist Dart:
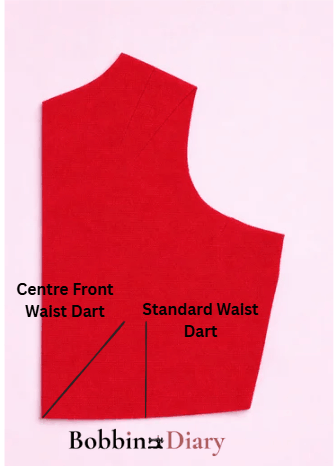
This is a wedge-shaped fold stitched at the waistline. It starts at the waist. It may look like a triangle with one end open.
This dress makes our waist look thinner. It also helps remove excess fabric, giving a fitted, contoured effect. It is used in dresses, pants, skirts, pleats, etc.
These settings avoid a messy or fuller look.
7. Double Waist Dart:
It is a double-pointed/ fisheye dart at the waistline. It tapers at two ends and becomes widest at the waist. This technique gives a proper fit at the waist, bust, and hip.
It gives a tailored silhouette look to the waistline in jackets, pants, skirts, etc.
8. Centre Front Bust Dart:

It begins from the center front line and runs to the bust points.
It is stitched in a horizontal diagonal position.
This dart covers extra fabric around the waist. It also offers a proper fit around the bust’s curved area. I use this dart manipulation along with pleats below the bustline (near the waistline) to give a fuller appearance.
My secret hack:
Sometimes, we end up giving a pointed look at the bust tip while stitching this dart. It looks unaesthetic. To avoid this, I always stitch this dart 1 inch away from the bust point for a softer, more pleasing look.
9. Side Straight Dart (Under The Arm):
It is actually a bust dart. A flat fabric is sewn into a 3-D shape to fit the curved area of the bust.
The fabric is cut into a triangular wedge shape. It begins from the side seam and tapers to the point aiming at the bust point.
I like to keep this dart position two inches below the armhole. Everyone’s cup size is different. So, for comfy fitting, I stop the dart legs 1 to 4 inches before the bust point. This trick helps me to avoid a pulled or uneven look around the bust area.
I also prefer tying the thread ends by hand instead of backstitching. And, for a final finish, I press the dart downwards over the tailor’s ham.
10. Elbow Dart:
This dart is located at the back of the elbow. It is a wedge-shaped stitched fold of fabric on the sleeve.
An elbow dart transforms flat fabric into a 3D shape that fits the elbows. It allows the arm’s natural mobility at the elbow area
And, This dart also avoids excess fabric gathering at the elbow. It is used in the sleeves of jackets, shirts, blazers, etc.
So, When to avoid elbow dart?
I avoid adding elbow darts in sleeves of flowy, loose, or stretchy outfits! It is more suitable for structured or thick fabrics where a proper silhouette is mandatory!
11. Pant Dart:
When a bodice has a small waist but large hips, it needs pant darts for a proper look. It prevents our waist from gaping. It’s a vertical triangular wedge from the waistband to the fullest point of the hips.
I stitch the dart legs together from the wide end at the waist down to a hip point. It forms a fold that gives a proper fitted look.
A pant dart is a triangular stitched fold of fabric.
It is used in sewing to taper the waistline of trousers, formal pants, etc.
12. Hem Dart:
It is a small vertical dart at the hemline. It is used to taper the trouser bottoms, skirt hemlines, sleeve cuffs, etc. This gives a small balloon-like shape at the wrist or ankles.
Its dart legs run from the edge of the hem to the top. This means, we have to stitch it wrong/ reverse direction
In a sleeve hem dart, a vertical dart runs from the little finger at the wrist. It runs straight up to the elbow area. This makes the sleeve fit comfortably on the lower arm.
My 3 Secret Tips For Sewing Darts:
1. Stay Away From ‘Dart Bubble’:
A common mistake that happens with every beginner is: ending up stitching dart bubbles for 3-D shapes.
A dart bubble is a puckered portion of fabric or a pointy, edgy look at the dart tip/ apex.
To avoid this, avoid backstitches at the dart legs. Leave a long thread end and tie it by hand. It gives a fuller and softer look.
2. Always Press Over Curved Surface:
This is a must.
Press the darts over the curved area. Use a tailor’s ham for that. This practice maintains the 3-D shape for long.
I prefer pressing to the centre of the garment for vertical darts. Vice versa, I press horizontal darts downward.
3. Pay Attention To These Measuring Guides While Sewing Darts:
Many beginners become confused when choosing the right dart dimensions. So, to let go that confusion, I have developed this general guide that is effective for overall body measurements.
Here is my go-to guide for that:
- When the dart width is 2 inches, choose the dart length of 6 ½ inches.
- When the dart width is 1 ½ inches, use the dart length of 6 inches.
- When the dart width is 1 ¼ inches, choose the dart length 5 ½ inches.
- When the dart width is 1 inch, select the dart length of 4 ½ inches.
- When the dart width is ¾ inch, select the dart length of 3 ½ inches.
For a snug fit, this will vary slightly from person to person, depending on body size.
Important Fact: dart width depends on how much fullness you need at the tip.
How To Sew A Dart?
Once you have understood dart positions, manipulations, and types, you can sew any dart with this basic technique:

- Draw the bodice on plain paper. Keep your fabric below that.
- Take proper measurements of the dart legs, tip, and fabric needed.
- Mark lines for the dart legs and tip where you want the 3-D shape.
- Use pins to fix the dart legs and tip on the paper and fabric together.
- Cut along the dart legs.
- Cut out the dart to the width you require to take in. I include the seam allowance, too.
- Tape this cut part together for the paper. (You can stitch the fabric together on the dart legs instead of taping.)
Key Takeaways:
Placing and manipulating darts is easy. All you need is regular practice.
For better accuracy, draw a dart on paper first. Pin that paper on the fabric. You can cut the paper and fabric together to get the right measurements. This is a must practice for beginners.
Whether it is a bust dart or an elbow dart, always measure the proper dart length and width properly. Make sure you tie the thread ends by hand to prevent puckering. It looks way better than backstitching.
So, keep practicing and do better each day! Do let me know your feedback in the comments below!
FAQs:
1. Which Is The Easiest Dart In Sewing?
For me, these three are the easiest darts in sewing: the single-pointed dart, bust dart, and straight waist dart. Any beginner can start with these darts.
2. Which Darts are Difficult To Sew?
French, curved, and double darts may feel difficult to sew, especially for beginners. You can master them with regular practice. Long tapering darts in heavy fabrics may also feel hard at first.